In this lesson we will:
- find out what is res/values folder needed for, what can you store in it and how to use it.
Translated by Taras Leskiv (http://android-by-example.blogspot.com/)
In the res folder, subfolders of different application resources are stored. We already have a good knowledge about layout-files in res/layout folder. I also mentioned about res/drawable folder with density suffixes - images are stored in it. Now pay attention to res/values folder. It is intended for resources (constants) storage of different types. We will look through String and Color types.
Create a project:
Project name: P0111_ResValues
Build Target: Android 2.3.3
Application name: ResValues
Package name: ru.startandroid.develop.resvalues
Create Activity: MainActivity
Open res/values/strings.xml file:
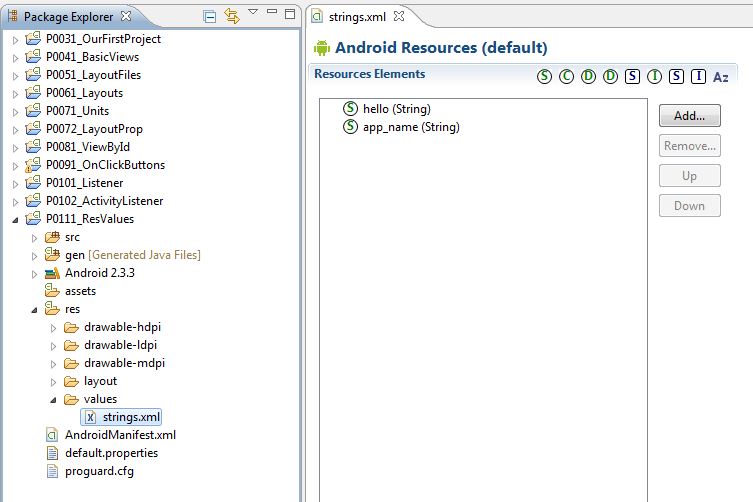
We can see two elements of the String type:
hello - is used by default in the Text property of the TextView in main.xml. And correspondingly, TextView displays the value of this element.

app_name - is used by default as a title for your application and Activity. This constant is used in the manifest-file, but we are not familiar with it yet.
You can click on these elements and see what do they represent on the right: Name and Value

Name - it is an ID. It must be unique and a constant is generated for it in R.java, so we could access this String-element from code.

If we have a look at XML inside strings.xml file (tab at the bottom - the same as for main.xml), we can see that everything is clear and simple there. Let’s try using resources.
To begin with, create this layout in main.xml:
<?xml version="1.0" encoding="utf-8"?>
<LinearLayout
	xmlns:android="http://schemas.android.com/apk/res/android"
	android:layout_height="match_parent"
	android:layout_width="match_parent"
	android:orientation="vertical">
	<LinearLayout
		android:layout_width="match_parent"
		android:id="@+id/llTop"
		android:orientation="vertical"
		android:layout_weight="1"
		android:layout_height="match_parent">
		<TextView
			android:text="TextView"
			android:layout_width="wrap_content"
			android:layout_height="wrap_content"
			android:layout_gravity="center_horizontal"
			android:id="@+id/tvTop"
			android:layout_marginTop="30dp">
		</TextView>
		<Button
			android:text="Button"
			android:layout_height="wrap_content"
			android:layout_gravity="center_horizontal"
			android:id="@+id/btnTop"
			android:layout_width="wrap_content">
		</Button>
	</LinearLayout>
	<LinearLayout
		android:layout_width="match_parent"
		android:id="@+id/llBottom"
		android:orientation="vertical"
		android:layout_weight="1"
		android:layout_height="match_parent">
		<TextView
			android:text="TextView"
			android:layout_width="wrap_content"
			android:layout_height="wrap_content"
			android:layout_gravity="center_horizontal"
			android:id="@+id/tvBottom"
			android:layout_marginTop="30dp">
		</TextView>
		<Button
			android:text="Button"
			android:layout_width="wrap_content"
			android:layout_height="wrap_content"
			android:layout_gravity="center_horizontal"
			android:id="@+id/btnBottom">
		</Button>
	</LinearLayout>
</LinearLayout>
The screen is divided into two equal parts, which contain LinearLayout, Button and TextView. We will specify a background color for LinearLayout and change text for TextView and Button. Let’s implement this using resources. And we will configure View-elements in the top part manually using properties, the bottom part - programmatically.
Let’s create our resource file in the values folder and name it myres.


After creating a file, the editor opens. It is simple to add an element - click Add button, choose the type and write name and value on the right. We will create 4 String-elements and 2 Color-elements:
<?xml version="1.0" encoding="utf-8"?>
<resources>
	<string name="tvTopText">Upper text</string>
	<string name="btnTopText">Upper button</string>
	<string name="tvBottomText">Bottom text</string>
	<string name="btnBottomText">Bottom button</string>
	<color name="llTopColor">#336699</color>
	<color name="llBottomColor">#339966</color>
</resources>
You can input this text manually for practice, or you can just copy this text into myres.xml. Don’t forget to save the file. Have a look into R.java and make sure that everything appeared there:

Ok, now when all the resources are created, let’s configure View-elements to use them. Elements on the top for beginning:
llTop - find Background property in Properties and click the selection button (the ellipsis), in the Color branch highlight llTopColor and click OK
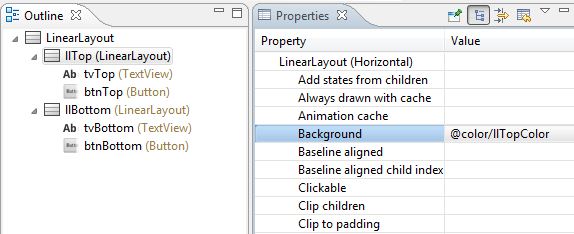
tvTop - for Text property open the selection window and find tvTopText there.
btnTop - for Text property open the selection window and find btnTopText there.
The color of the top part of the screen has changed and the inscriptions have changed to those we specified in myres.xml.
To change the bottom part of the screen, we will write some code. First, find the elements, then set their values.
public class MainActivity extends Activity {
  /** Called when the activity is first created. */
  @Override
  public void onCreate(Bundle savedInstanceState) {
    super.onCreate(savedInstanceState);
    setContentView(R.layout.main);

    LinearLayout llBottom = (LinearLayout) findViewById(R.id.llBottom);
    TextView tvBottom = (TextView) findViewById(R.id.tvBottom);
    Button btnBottom = (Button) findViewById(R.id.btnBottom);

    llBottom.setBackgroundResource(R.color.llBottomColor);
    tvBottom.setText(R.string.tvBottomText);
    btnBottom.setText(R.string.btnBottomText);

  }
}
Note that for changing text setText method is used. But it is not the same setText that we used when setting text directly. This method takes an ID as a parameter and we use R.java, which stores all our resource IDs. As you see methods have the same name but have different parameters. This is common in Java.
Save, run and check. Now texts and colors are taken from the resource file. You can change the contents of myres.xml (text of the upper button, for instance), save, run the application and you will see your changes.
Sometimes it is required to get the value of the resource in code, not its ID. It is accomplished this way:
getResources().getString(R.string.tvBottomText);
This expression will return text "Bottom text", which corresponds to the String resource with name = tvBottomText.
In conclusion, I will tell a few words about files organization for storing resources. We have just created String and Color resources in a single file myres.xml, but it is recommended to split them into different files (e.g. strings.xml, colors.xml ...) and I will follow this recommendation further. There are reasons for that and we will have evidence for this in future.
Resource names are prevailing for all the files in res/values folder. So you cannot create a resource with the same name and type in different files.
You can name resource files as you wish and you can create as many files as you need. All the constants for resources from these files will be generated in R.java.
In the next lesson we will:
- look through application logs and Toast messages
Присоединяйтесь к нам в Telegram:
- в канале StartAndroid публикуются ссылки на новые статьи с сайта startandroid.ru и интересные материалы с хабра, medium.com и т.п.
- в чатах решаем возникающие вопросы и проблемы по различным темам: Android, Compose, Kotlin, RxJava, Dagger, Тестирование, Performance
- ну и если просто хочется поговорить с коллегами по разработке, то есть чат Флудильня

")