In this lesson we will:
- learn how to use one listener for several View-elements
- teach Activity to to act as a listener
Translated by Taras Leskiv (http://android-by-example.blogspot.com/)
Create a project:
Project name: P0101_Listener
Build Target: Android 2.3.3
Application name: Listener
Package name: ru.startandroid.develop.listener
Create Activity: MainActivity
We will be working with the same View from the previous lesson. main.xml code:
<?xml version="1.0" encoding="utf-8"?>
<LinearLayout
	xmlns:android="http://schemas.android.com/apk/res/android"
	android:layout_height="match_parent"
	android:layout_width="match_parent"
	android:orientation="horizontal">
	<LinearLayout
		android:id="@+id/linearLayout1"
		android:layout_height="match_parent"
		android:orientation="vertical"
		android:layout_width="match_parent"
		android:layout_margin="30dp">
		<TextView
			android:layout_width="wrap_content"
			android:text="TextView"
			android:layout_height="wrap_content"
			android:id="@+id/tvOut"
			android:layout_gravity="center_horizontal"
			android:layout_marginBottom="50dp">
		</TextView>
		<Button
			android:layout_height="wrap_content"
			android:layout_gravity="center_horizontal"
			android:id="@+id/btnOk"
			android:text="OK"
			android:layout_width="100dp">
		</Button>
		<Button
			android:layout_height="wrap_content"
			android:layout_gravity="center_horizontal"
			android:id="@+id/btnCancel"
			android:text="Cancel"
			android:layout_width="100dp">
		</Button>
	</LinearLayout>
</LinearLayout>
One listener for two buttons
So we have a TextView with text and two buttons. We will make the content of the TextView change when a button is clicked as in the previous lesson. When OK button is clicked - we will show text "OK button was clicked", when Cancel button - "Cancel button was clicked". But this time, we will implement this using one listener that will process clicks for both buttons.
I will remind you the mechanism of processing an event by button click example. The button cannot process a click on its own, it needs a listener, which is assigned using setOnClickListener method. When the button is clicked, the listener reacts and runs the code from onClick method.
So we need to perform the following steps for implementation:
- create a listener
- implement onClick method
- assign listener to a button
In our case we will assign one listener to multiple buttons, and we will have to define inside the listener which button has been clicked.
Prepare objects and create a listener:
public class MainActivity extends Activity {

   TextView tvOut;
   Button btnOk;
   Button btnCancel;

   /** Called when the activity is first created. */
   @Override
   public void onCreate(Bundle savedInstanceState) {
     super.onCreate(savedInstanceState);
     setContentView(R.layout.main);

     // find View-elements
     tvOut = (TextView) findViewById(R.id.tvOut);
     btnOk = (Button) findViewById(R.id.btnOk);
     btnCancel = (Button) findViewById(R.id.btnCancel);

     // create a listener
     OnClickListener oclBtn = new OnClickListener() {
       @Override
       public void onClick(View v) {
         // TODO Auto-generated method stub

       }
     };

   }
 }
Let's implement onClick method. It is passed View object as a parameter and its exactly what we need. This is a View which has been clicked and which invoked the listener. So in our case it would be either OK or Cancel button. The only thing that is left is to find out the ID of this View and compare it to our R.id.btnOk and R.id.btnCancel, to define which button was that. To get the ID of a View, use getId method. To go through the results we will use java switch operator.
onClick method implementation:
      public void onClick(View v) {
         // define the button that invoked the listener by id
         switch (v.getId()) {
         case R.id.btnOk:
           // OK button
           tvOut.setText("OK button was clicked");
           break;
         case R.id.btnCancel:
           // Cancel button
           tvOut.setText("Cancel button was clicked");
           break;
         }
       }
If you run the application now and check clicking buttons, nothing will happen. We have created a listener but we didn’t assign it to any buttons. Now assign the same listener to both buttons:
    btnOk.setOnClickListener(oclBtn);
    btnCancel.setOnClickListener(oclBtn);
As you already understand, one listener can be assigned not only to two buttons but to any number of them. And not only to buttons. Other View-elements also have different events, which require listeners. Later we will be working with them. But for now, it is important to understand how event processing is done.
The difference in implementation between this and previous lesson is that now we have created one listener-object for both buttons, but on previous lesson - we had two listener objects, one for each button. There is a rule - the less objects you create the better, as memory is allocated for each object and it is a quite limited resource, especially for mobile devices. That’s why creating one listener for several Views is better from the optimization point of view. Also the amount of code is reduced and it becomes more readable.
There is one more way of creating a listener, which does not require creating an object. We will use an object that is already created - Activity.
Activity as a listener
Button is assigened a listener using setOnClickListener (View.OnClickListener l) method. It means that any object that implements View.OnClickListener interface fits here. Why don’t make an Activity such an object? We will just make Activity implement View.OnClickListener interface and fill its onCreate method.
Let’s create a new project for this purpose:
Project name: P0102_ActivityListener
Build Target: Android 2.3.3
Application name: ActivityListener
Package name: ru.startandroid.develop.activitylistener
Create Activity: MainActivity
Let’s use the same layout again:
<?xml version="1.0" encoding="utf-8"?>
<LinearLayout
	xmlns:android="http://schemas.android.com/apk/res/android"
	android:layout_height="match_parent"
	android:layout_width="match_parent"
	android:orientation="horizontal">
	<LinearLayout
		android:id="@+id/linearLayout1"
		android:layout_height="match_parent"
		android:orientation="vertical"
		android:layout_width="match_parent"
		android:layout_margin="30dp">
		<TextView
			android:layout_width="wrap_content"
			android:text="TextView"
			android:layout_height="wrap_content"
			android:id="@+id/tvOut"
			android:layout_gravity="center_horizontal"
			android:layout_marginBottom="50dp">
		</TextView>
		<Button
			android:layout_height="wrap_content"
			android:layout_gravity="center_horizontal"
			android:id="@+id/btnOk"
			android:text="OK"
			android:layout_width="100dp">
		</Button>
		<Button
			android:layout_height="wrap_content"
			android:layout_gravity="center_horizontal"
			android:id="@+id/btnCancel"
			android:text="Cancel"
			android:layout_width="100dp">
		</Button>
	</LinearLayout>
</LinearLayout>
Prepare objects and add the interface implementation (implements onClickListener)
public class MainActivity extends Activity implements OnClickListener {

   TextView tvOut;
   Button btnOk;
   Button btnCancel;

   /** Called when the activity is first created. */
   @Override
   public void onCreate(Bundle savedInstanceState) {
     super.onCreate(savedInstanceState);
     setContentView(R.layout.main);

     // find View-elements
     tvOut = (TextView) findViewById(R.id.tvOut);
     btnOk = (Button) findViewById(R.id.btnOk);
     btnCancel = (Button) findViewById(R.id.btnCancel);
   }
 }
onClickListener is underlined with red as it is not present in import section. Press CTRL + SHIFT + O and choose View.OnClickListener.
Now Eclipse underlines MainActivity. This is happening because MainActivity implements the interface, but doesn’t implement its methods yet. Let’s correct it using Eclipse. Place the cursor over MainActivity and choose Add unimplemented methods.
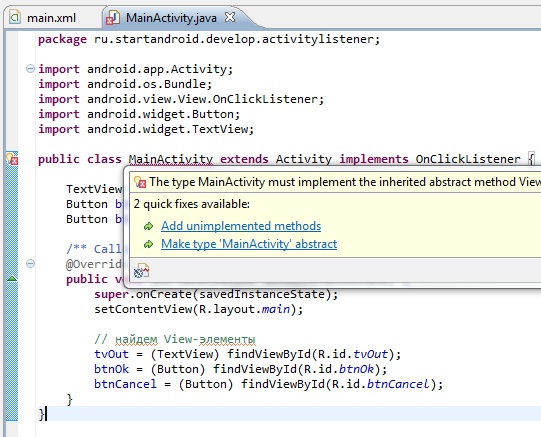
Eclipse will add onClick method that we are already familiar with. Only now this method will be implemented in Activity, not in a separate listener object. So Activity will act as a listener correspondingly.
Let’s implement a method exactly as the previous time. Nothing has changed. It is also passed a View (on which an event has happened) as a parameter, we define which View exactly was that by Id and perform the corresponding actions:
  public void onClick(View v) {
     // define the button that invoked the listener by id
     switch (v.getId()) {
     case R.id.btnOk:
       // ОК button
       tvOut.setText("OK button was clicked");
       break;
     case R.id.btnCancel:
       // Cancel button
       tvOut.setText("Cancel button was clicked");
       break;
     }
   }
The only thing left to do is to assign listener to buttons. It will be object this, which is the current MainActivity object.
    btnOk.setOnClickListener(this);
    btnCancel.setOnClickListener(this);
We haven’t created any unnecessary objects in this implementation (Activity is created anyway) and memory expenditure is minimal, so this is a preferred method. But this implementation may seem complicated and incomprehensible, especially if you a have small experience in object-oriented programming. In this case use the implementation that is understandable and convenient for you. And understanding will come for sure with time and experience.
The complete code:
public class MainActivity extends Activity implements OnClickListener {

   TextView tvOut;
   Button btnOk;
   Button btnCancel;

   /** Called when the activity is first created. */
   @Override
   public void onCreate(Bundle savedInstanceState) {
     super.onCreate(savedInstanceState);
     setContentView(R.layout.main);

     // find View-elements
     tvOut = (TextView) findViewById(R.id.tvOut);
     btnOk = (Button) findViewById(R.id.btnOk);
     btnCancel = (Button) findViewById(R.id.btnCancel);

     // assign listeners to buttons
     btnOk.setOnClickListener(this);
     btnCancel.setOnClickListener(this);
   }

   @Override
   public void onClick(View v) {
     // define the button that invoked the listener by id
     switch (v.getId()) {
     case R.id.btnOk:
       // ОК button
       tvOut.setText("OK button was clicked");
       break;
     case R.id.btnCancel:
       // Cancel button
       tvOut.setText("Cancel button was clicked");
       break;
     }
   }

 }
The most simple listener implementation
There is one more way of implementing a listener. In the layout-file (main.xml) when describing a button write:
<?xml version="1.0" encoding="utf-8"?>
<Button
	android:id="@+id/btnStart"
	android:layout_width="wrap_content"
	android:layout_height="wrap_content"
	android:onClick="onClickStart"
	android:text="start">
</Button>
We are using onClick attribute. In this attribute we specify the name of the method in Activity. This method will be invoked when the button is clicked.
Then, add this method inisde Activity (MainActivity.java). Method requirements: public, void and receives a View object as a parameter:
  public void onClickStart(View v) {
    // actions when the button is clicked
  }
Write all the actions you need inside this method and they will be performed when the button is clicked.
Присоединяйтесь к нам в Telegram:
- в канале StartAndroid публикуются ссылки на новые статьи с сайта startandroid.ru и интересные материалы с хабра, medium.com и т.п.
- в чатах решаем возникающие вопросы и проблемы по различным темам: Android, Compose, Kotlin, RxJava, Dagger, Тестирование, Performance
- ну и если просто хочется поговорить с коллегами по разработке, то есть чат Флудильня

")