This lesson:
- usage of delete and query methods with parameters
The last lesson we found out how to insert a row, read all rows or clear the table. Now, let’s have a look how to update or delete an exact row.
We won’t create a new project, we will use P0341_SimpleSQLite from the last lesson. Let’s change the layout for a bit with adding editText for ID field and update and delete buttons.
Rewrite main.xml:
<?xml version="1.0" encoding="utf-8"?>
<LinearLayout
    xmlns:android="http://schemas.android.com/apk/res/android"
    android:layout_width="fill_parent"
    android:layout_height="fill_parent"
    android:orientation="vertical">
    <LinearLayout
        android:id="@+id/linearLayout4"
        android:layout_width="match_parent"
        android:layout_height="wrap_content"
        android:layout_marginTop="5dp">
        <TextView
            android:layout_width="wrap_content"
            android:layout_height="wrap_content"
            android:text="ID"
            android:layout_marginLeft="5dp"
            android:layout_marginRight="25dp">
        </TextView>
        <EditText
            android:id="@+id/etID"
            android:layout_width="70dp"
            android:layout_height="wrap_content"
            android:layout_marginTop="2dp">
        </EditText>
        <Button
            android:id="@+id/btnUpd"
            android:layout_width="wrap_content"
            android:layout_height="wrap_content"
            android:text="Update">
        </Button>
        <Button
            android:id="@+id/btnDel"
            android:layout_width="wrap_content"
            android:layout_height="wrap_content"
            android:text="Delete">
        </Button>
    </LinearLayout>
    <LinearLayout
        android:id="@+id/linearLayout1"
        android:layout_width="match_parent"
        android:layout_height="wrap_content">
        <TextView
            android:layout_width="wrap_content"
            android:layout_height="wrap_content"
            android:text="Name"
            android:layout_marginLeft="5dp"
            android:layout_marginRight="5dp">
        </TextView>
        <EditText
            android:id="@+id/etName"
            android:layout_width="wrap_content"
            android:layout_height="wrap_content"
            android:layout_weight="1">
            <requestFocus>
            </requestFocus>
        </EditText>
    </LinearLayout>
    <LinearLayout
        android:id="@+id/linearLayout3"
        android:layout_width="match_parent"
        android:layout_height="wrap_content">
        <TextView
            android:id="@+id/textView2"
            android:layout_width="wrap_content"
            android:layout_height="wrap_content"
            android:text="Email"
            android:layout_marginLeft="5dp"
            android:layout_marginRight="5dp">
        </TextView>
        <EditText
            android:id="@+id/etEmail"
            android:layout_width="wrap_content"
            android:layout_height="wrap_content"
            android:layout_weight="1">
        </EditText>
    </LinearLayout>
    <LinearLayout
        android:id="@+id/linearLayout2"
        android:layout_width="match_parent"
        android:layout_height="wrap_content">
        <Button
            android:id="@+id/btnAdd"
            android:layout_width="wrap_content"
            android:layout_height="wrap_content"
            android:text="Add">
        </Button>
        <Button
            android:id="@+id/btnRead"
            android:layout_width="wrap_content"
            android:layout_height="wrap_content"
            android:text="Read">
        </Button>
        <Button
            android:id="@+id/btnClear"
            android:layout_width="wrap_content"
            android:layout_height="wrap_content"
            android:text="Clear">
        </Button>
    </LinearLayout>
</LinearLayout>
Clicking the Update button we will read Name and Email fields content and update the row with id equals to ID field content value. Clicking the Delete button we will delete the row with this id.
The screen's appearance isn't the best from the point of usability, but we are not in a designers crash course here, we are learning the database.
Let’s edit MainActivity.java, determine new views and set listeners for buttons.
  final String LOG_TAG = "myLogs";

  Button btnAdd, btnRead, btnClear, btnUpd, btnDel;
  EditText etName, etEmail, etID;

  ...

  public void onCreate(Bundle savedInstanceState) {

    ...

    btnClear = (Button) findViewById(R.id.btnClear);
    btnClear.setOnClickListener(this);

    btnUpd = (Button) findViewById(R.id.btnUpd);
    btnUpd.setOnClickListener(this);

    btnDel = (Button) findViewById(R.id.btnDel);
    btnDel.setOnClickListener(this);

    etName = (EditText) findViewById(R.id.etName);
    etEmail = (EditText) findViewById(R.id.etEmail);
    etID = (EditText) findViewById(R.id.etID);

    // create object for database creation and version control
    dbHelper = new DBHelper(this);
  }
(Use only selected lines)
Now let’s add some code into onClick:
 public void onClick(View v) {

    // create object for data
    ContentValues cv = new ContentValues();

    // get data from editText fields
    String name = etName.getText().toString();
    String email = etEmail.getText().toString();
    String id = etID.getText().toString();

    // connect to database
    SQLiteDatabase db = dbHelper.getWritableDatabase();

    switch (v.getId()) {
    case R.id.btnAdd:
      ...
    case R.id.btnRead:
      ...
    case R.id.btnClear:
      ...
    case R.id.btnUpd:
      if (id.equalsIgnoreCase("")) {
        break;
      }
      Log.d(LOG_TAG, "--- Update mytable: ---");
      // prepare values for update
      cv.put("name", name);
      cv.put("email", email);
      // обновляем по id
      int updCount = db.update("mytable", cv, "id = ?",
          new String[] { id });
      Log.d(LOG_TAG, "updated rows count = " + updCount);
      break;
    case R.id.btnDel:
      if (id.equalsIgnoreCase("")) {
        break;
      }
      Log.d(LOG_TAG, "--- Delete from mytable: ---");
      // update by id
      int delCount = db.delete("mytable", "id = " + id, null);
      Log.d(LOG_TAG, "deleted rows count = " + delCount);
      break;
    }
    // close database connection
    dbHelper.close();
  }
(Use only selected lines)
We add an id variable and initialize it with etID field value. Then we add two new cases within the switch statement:
btnUpd case is for row updating. We check that the id’s value is not empty, put data for update into the cv and update the row with update method with arguments: the table name, ContentValues filled with update data, the condition string and an array of arguments for it. I used a question mark within the condition string. This mark will be substituted with a value from the array of arguments, in our case it is id variable value. In case there are several question marks in the string, they will be substituted with values from the array by order. Update method returns a number of updater rows, which we display in logs.
btnDel case is for row deleting. We check that the id’s value is not empty and then call delete method with arguments: the table name,the condition string and the array of condition arguments. Delete method returns a number of deleted rows, which we display in logs.
Note, that the conditions for both update and delete are the same, id value from the etID editText field. But I coded them a little bit differently. I used a question mark within update method and an exact value within delete method as a conditions. This way I just wanted to show you two ways to set the arguments, and now you may use that one, that suits to you or to situation.
Now let’s save and launch the project. We added some rows the past lesson, but have deleted them. So, I will add them again and click Read button. Let’s look in logs:
ID = 3, name = Ivan Petrov, email = ipetrov @abc.com
ID = 4, name = Anton Sidorov, email = asidorov @def.com
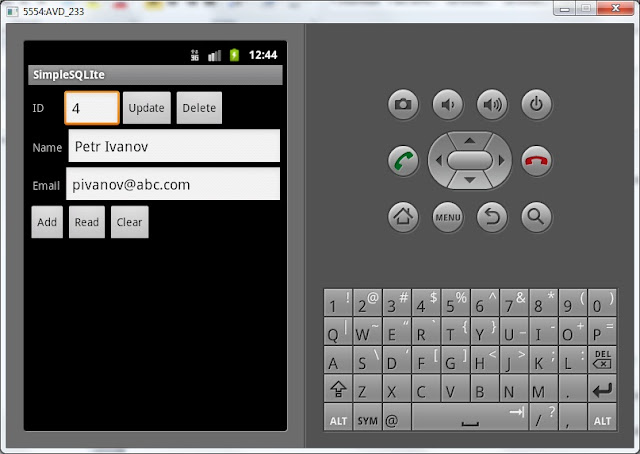
Now, let’s try to update the row with id equals to 3. To do this we will enter 3 in ID field and new data into Name and Email fields:

Click Update button and look in logs:
-- Update mytable: ---
updated rows count = 1
One row was updated. That’s right.
Let’s click Read and get sure about it. Look in logs:
ID = 3, name = Petr Ivanov, email = pivanov @abc.com
ID = 4, name = Anton Sidorov, email = asidorov @def.com
It was really updated
Now let’s delete the row with id equals to 4. Enter 4 into ID field
Click delete button and look in logs:
--- Delete from mytable: ---
deleted rows count = 1
One row was deleted.
Click Read and look in logs:
--- Rows in mytable: ---
ID = 3, name = Petr Ivanov, email = pivanov @abc.com
There is only one row left.
If you try to delete a row with empty id value, nothing will happen, because we have included a check in our statement. In case you try to delete a row with out of range id value, the delete method will return 0. I.e. nothing was deleted, because the row has not been found.
Now you know how to read, add, delete and update rows in SQLite.
MainActivity.java full code:
package ru.startandroid.develop.p0341simplesqlite;

import ru.startandroid.develop.p0341simpelsqlite.R;
import android.app.Activity;
import android.content.ContentValues;
import android.content.Context;
import android.database.Cursor;
import android.database.sqlite.SQLiteDatabase;
import android.database.sqlite.SQLiteOpenHelper;
import android.os.Bundle;
import android.util.Log;
import android.view.View;
import android.view.View.OnClickListener;
import android.widget.Button;
import android.widget.EditText;

public class MainActivity extends Activity implements OnClickListener {

  final String LOG_TAG = "myLogs";

  Button btnAdd, btnRead, btnClear, btnUpd, btnDel;
  EditText etName, etEmail, etID;

  DBHelper dbHelper;

  /** Called when the activity is first created. */
  public void onCreate(Bundle savedInstanceState) {
    super.onCreate(savedInstanceState);
    setContentView(R.layout.main);

    btnAdd = (Button) findViewById(R.id.btnAdd);
    btnAdd.setOnClickListener(this);

    btnRead = (Button) findViewById(R.id.btnRead);
    btnRead.setOnClickListener(this);

    btnClear = (Button) findViewById(R.id.btnClear);
    btnClear.setOnClickListener(this);

    btnUpd = (Button) findViewById(R.id.btnUpd);
    btnUpd.setOnClickListener(this);

    btnDel = (Button) findViewById(R.id.btnDel);
    btnDel.setOnClickListener(this);

    etName = (EditText) findViewById(R.id.etName);
    etEmail = (EditText) findViewById(R.id.etEmail);
    etID = (EditText) findViewById(R.id.etID);

    // create object for database creation and version control
    dbHelper = new DBHelper(this);
  }

  public void onClick(View v) {

    // create object for data
    ContentValues cv = new ContentValues();

    // get data from editText fields
    String name = etName.getText().toString();
    String email = etEmail.getText().toString();
    String id = etID.getText().toString();

    // connect to database
    SQLiteDatabase db = dbHelper.getWritableDatabase();

    switch (v.getId()) {
    case R.id.btnAdd:
      Log.d(LOG_TAG, "--- Insert in mytable: ---");
      // create data for insertion in a form of pairs: column name and value
      cv.put("name", name);
      cv.put("email", email);
      // insert row and get it’s ID
      long rowID = db.insert("mytable", null, cv);
      Log.d(LOG_TAG, "row inserted, ID = " + rowID);
      break;
    case R.id.btnRead:
      Log.d(LOG_TAG, "--- Rows in mytable: ---");
      // make a request for all data from mytable, get Cursor
      Cursor c = db.query("mytable", null, null, null, null, null, null);

      // put the cursor to the first row
      // false will be returned in case there are no rows
      if (c.moveToFirst()) {

        // determine the column numbers by names
        int idColIndex = c.getColumnIndex("id");
        int nameColIndex = c.getColumnIndex("name");
        int emailColIndex = c.getColumnIndex("email");

        do {
          // get values according to column numbers and put them to log
          Log.d(LOG_TAG,
              "ID = " + c.getInt(idColIndex) + ", name = "
                  + c.getString(nameColIndex) + ", email = "
                  + c.getString(emailColIndex));
          // moving to the next row
          // if the current row is the last and there are no rows we get false and leave the statement
        } while (c.moveToNext());
      } else
        Log.d(LOG_TAG, "0 rows");
      c.close();
      break;
    case R.id.btnClear:
      Log.d(LOG_TAG, "--- Clear mytable: ---");
      // delete all rows
      int clearCount = db.delete("mytable", null, null);
      Log.d(LOG_TAG, "deleted rows count = " + clearCount);
      break;
    case R.id.btnUpd:
      if (id.equalsIgnoreCase("")) {
        break;
      }
      Log.d(LOG_TAG, "--- Update mytable: ---");
      // prepare values for update
      cv.put("name", name);
      cv.put("email", email);
      // update by id
      int updCount = db.update("mytable", cv, "id = ?",
          new String[] { id });
      Log.d(LOG_TAG, "updated rows count = " + updCount);
      break;
    case R.id.btnDel:
      if (id.equalsIgnoreCase("")) {
        break;
      }
      Log.d(LOG_TAG, "--- Delete from mytable: ---");
      // delete by id
      int delCount = db.delete("mytable", "id = " + id, null);
      Log.d(LOG_TAG, "deleted rows count = " + delCount);
      break;
    }
    // close database connection
    dbHelper.close();
  }

  class DBHelper extends SQLiteOpenHelper {

    public DBHelper(Context context) {
      // superclass constructor
      super(context, "myDB", null, 1);
    }

    public void onCreate(SQLiteDatabase db) {
      Log.d(LOG_TAG, "--- onCreate database ---");
      // create table with columns
      db.execSQL("create table mytable ("
          + "id integer primary key autoincrement,"
          + "name text,"
          + "email text" + ");");
    }

    public void onUpgrade(SQLiteDatabase db, int oldVersion, int newVersion) {

    }
  }

}
The next lesson:
- exploring the query in details (a method for data reading)
- sorting, grouping, conditions, having
Присоединяйтесь к нам в Telegram:
- в канале StartAndroid публикуются ссылки на новые статьи с сайта startandroid.ru и интересные материалы с хабра, medium.com и т.п.
- в чатах решаем возникающие вопросы и проблемы по различным темам: Android, Compose, Kotlin, RxJava, Dagger, Тестирование, Performance
- ну и если просто хочется поговорить с коллегами по разработке, то есть чат Флудильня

")