This lesson:
- data storing with preferences.
Enough speaking about Intent and Activity. Let’s speak about data storing. There are several ways to store data in android:
Preferences - like windows INI-files.
SQLite - database and tables.
Common files - internal and external (on SD card)
We will begin with the simplest - with Preferences. This case values are used to be saved by pairs with names and values, as well as extras within the intent.
Let’s develop an app. There will be an editText field and Save and Load buttons. We will save value from the EditText, clicking the Save button and load this value, clicking the Load button.
Let’s create a new project:
Project name: P0331_SharedPreferences
Build Target: Android 2.3.3
Application name: SharedPreferences
Package name: ru.startandroid.develop.p0331sharedpreferences
Create Activity: MainActivity
Let’s open main.xml and code this layout:
<?xml version="1.0" encoding="utf-8"?>
<LinearLayout
    xmlns:android="http://schemas.android.com/apk/res/android"
    android:layout_width="fill_parent"
    android:layout_height="fill_parent"
    android:orientation="vertical">
        <EditText
            android:id="@+id/etText"
            android:layout_width="match_parent"
            android:layout_height="wrap_content">
                <requestFocus>
                </requestFocus>
        </EditText>
        <LinearLayout
            android:id="@+id/linearLayout1"
            android:layout_width="match_parent"
            android:layout_height="wrap_content"
            android:orientation="horizontal">
                <Button
                    android:id="@+id/btnSave"
                    android:layout_width="wrap_content"
                    android:layout_height="wrap_content"
                    android:text="Save">
                </Button>
                <Button
                    android:id="@+id/btnLoad"
                    android:layout_width="wrap_content"
                    android:layout_height="wrap_content"
                    android:text="Load">
                </Button>
        </LinearLayout>
</LinearLayout>
an EditText view and two buttons
Now, let’s code MainActivity.java:
package ru.startandroid.develop.p0331sharedpreferences;

import android.app.Activity;
import android.content.SharedPreferences;
import android.content.SharedPreferences.Editor;
import android.os.Bundle;
import android.view.View;
import android.view.View.OnClickListener;
import android.widget.Button;
import android.widget.EditText;
import android.widget.Toast;

public class MainActivity extends Activity implements OnClickListener {

  EditText etText;
  Button btnSave, btnLoad;

  SharedPreferences sPref;

  final String SAVED_TEXT = "saved_text";


    /** Called when the activity is first created. */
    @Override
    public void onCreate(Bundle savedInstanceState) {
        super.onCreate(savedInstanceState);
        setContentView(R.layout.main);

        etText = (EditText) findViewById(R.id.etText);

        btnSave = (Button) findViewById(R.id.btnSave);
        btnSave.setOnClickListener(this);

        btnLoad = (Button) findViewById(R.id.btnLoad);
        btnLoad.setOnClickListener(this);
    }

  @Override
  public void onClick(View v) {
    switch (v.getId()) {
    case R.id.btnSave:
      saveText();
      break;
    case R.id.btnLoad:
      loadText();
      break;
    default:
      break;
    }
  }

  void saveText() {
    sPref = getPreferences(MODE_PRIVATE);
    Editor ed = sPref.edit();
    ed.putString(SAVED_TEXT, etText.getText().toString());
    ed.commit();
    Toast.makeText(this, "Text saved", Toast.LENGTH_SHORT).show();
  }

  void loadText() {
    sPref = getPreferences(MODE_PRIVATE);
    String savedText = sPref.getString(SAVED_TEXT, "");
    etText.setText(savedText);
    Toast.makeText(this, "Text loaded", Toast.LENGTH_SHORT).show();
  }
}
Views determining, listeners setting and an onClick implementation are common. We are interested in the methods which we call within onClick.
The saveText method is for data save. At first, we get SharedPreferences sPref object with getPreferences method which allows us to work with data (to read and to right). The MODE_PRIVATE constant is used for an access adjustment, it means that data would be accessible only for this app after saving. We need an Editor object for data editing and we will get it with sPref. We pass SAVED_TEXT as a key and a value from etText as data to the putString method. We must call commit to save data.
The loadText method is for data loading. We get a SharedPreferences sPref object similarly to SaveText. MODE_PRIVATE is used again, although it’s only used with data saving. We don’t use the Editor because we are only interested in data saving. We get data with the getString method.
Method parameters are key and default value (empty string). Then we set the etText with this value and display a message that data has been loaded.
Let’s save and launch the app.
At first, let’s make sure it works. Type anything in the editText field

and close the app without clicking save the button.
Now find your app in the emulator’s app list and launch it again.

The editText field is empty. Data we entered has been lost, after closing the app. The load button clicking also won’t be useful, because we haven’t saved anything.

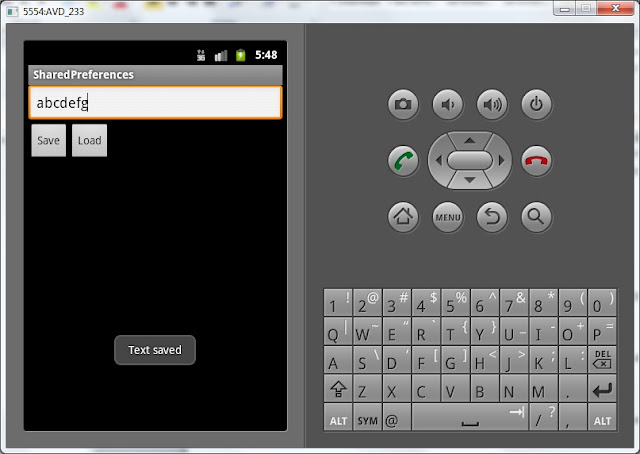
Let’s try to save something. Enter text again and click save button.

The value has been saved.
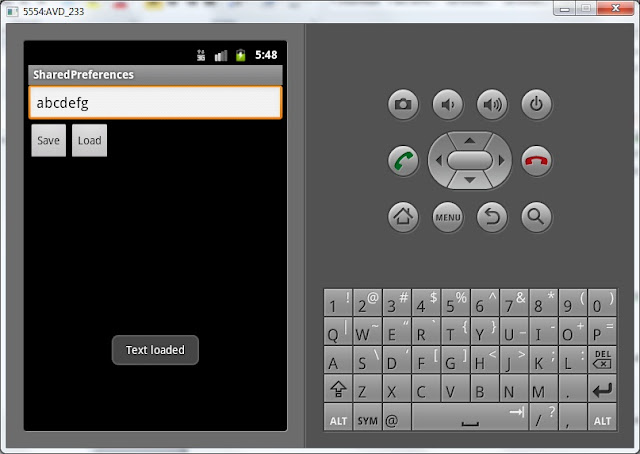
Now, let’s close the app by clicking the back button, launch it again and click Load. The value has been loaded and displayed.

Let’s make save and load work automatically while opening and closing the app without button clicking.To do that, we will call loadText method within onCreate.
public void onCreate(Bundle savedInstanceState) {

    ...

    btnLoad = (Button) findViewById(R.id.btnLoad);
    btnLoad.setOnClickListener(this);

    loadText();
}
(Add the 8th string only).
The saveText method will be called within onDestroy.
  @Override
  protected void onDestroy() {
    super.onDestroy();
    saveText();
  }
Let’s save and launch the app. Now we can close it after data entering and we won’t lose it. Save and Load buttons also work. It’s you decide which way to save your data: with button click, app closing, or any other way. The main thing is you know how to do it now.
Preferences data saves in files, and you can take a look at it. Open within Eclipse Window > Show View> Other and chose Android > File Explorer. The emulator’s file explorer would be displayed. Now open data/data/ru.startandroid.develop.p0331sharedpreferences/shared_prefs, you will find there MainActivity.xml file. You’ll see the next if you copy it to your PC and open:
<?xml version="1.0" encoding="utf-8"?>
<map>
        <string name="saved_text">abcdefg</string>
</map>
That’s right. Name is "saved_text" and value is "abcefg".
Note, that our package name is used within the file path.
Now let’s find out why MainActivity.xml is called so. There is getSharedPreferences method besides getPreferences. It provides the same functionality and also allows to set the save data file name. I.e.we use this code within the saveText method to get SharedPreferences, data would be saved to MyPref.xml instead of MainActivity.xml:
sPref = getSharedPreferences("MyPref", MODE_PRIVATE);
Now, if we look at the getPreferences source code, we’ll see:
public SharedPreferences getPreferences(int mode) {
  return getSharedPreferences(getLocalClassName(), mode);
}
The getSharedPreferences method is used, and current Activity name is passed to the method as a file name. So, that’s why the file name is MainActivity.xml.
Eventually:
- in case you work with data for the current activity, use getPreferences, if you don’t want to come up with the file name;
- in case of saving data which is common for several activities, use getSharedPreference to choose the file name.
By the way, within File Explorer you can see unix file access rwx-rights. Try to use MODE_WORLD_READABLE or MODE_WORLD_WRITEABLE instead of MODE_PRIVATE to save the file and look how rights will change.
MainActivity.java full code:
package ru.startandroid.develop.p0331sharedpreferences;

import android.app.Activity;
import android.content.SharedPreferences;
import android.content.SharedPreferences.Editor;
import android.os.Bundle;
import android.view.View;
import android.view.View.OnClickListener;
import android.widget.Button;
import android.widget.EditText;
import android.widget.Toast;

public class MainActivity extends Activity implements OnClickListener {

  EditText etText;
  Button btnSave, btnLoad;

  SharedPreferences sPref;

  final String SAVED_TEXT = "saved_text";


    /** Called when the activity is first created. */
    @Override
    public void onCreate(Bundle savedInstanceState) {
        super.onCreate(savedInstanceState);
        setContentView(R.layout.main);

        etText = (EditText) findViewById(R.id.etText);

        btnSave = (Button) findViewById(R.id.btnSave);
        btnSave.setOnClickListener(this);

        btnLoad = (Button) findViewById(R.id.btnLoad);
        btnLoad.setOnClickListener(this);

        loadText();
    }

  @Override
  public void onClick(View v) {
    switch (v.getId()) {
    case R.id.btnSave:
      saveText();
      break;
    case R.id.btnLoad:
      loadText();
      break;
    default:
      break;
    }
  }

  void saveText() {
    sPref = getPreferences(MODE_PRIVATE);
    Editor ed = sPref.edit();
    ed.putString(SAVED_TEXT, etText.getText().toString());
    ed.commit();
    Toast.makeText(this, "Text saved", Toast.LENGTH_SHORT).show();
  }

  void loadText() {
    sPref = getPreferences(MODE_PRIVATE);
    String savedText = sPref.getString(SAVED_TEXT, "");
    etText.setText(savedText);
    Toast.makeText(this, "Text loaded", Toast.LENGTH_SHORT).show();
  }

  @Override
  protected void onDestroy() {
    super.onDestroy();
    saveText();
  }

}
Next lesson:
- storing data with SQLite.
Присоединяйтесь к нам в Telegram:
- в канале StartAndroid публикуются ссылки на новые статьи с сайта startandroid.ru и интересные материалы с хабра, medium.com и т.п.
- в чатах решаем возникающие вопросы и проблемы по различным темам: Android, Compose, Kotlin, RxJava, Dagger, Тестирование, Performance
- ну и если просто хочется поговорить с коллегами по разработке, то есть чат Флудильня

