This lesson:
- understanding usage of requestCode and resultCode in onActivityResult.
Last lesson we fluently took a look at the way we call Activity for result. Let’s consider it in detail. We will create an app, which will launch two different activities and get the result back. As we remember, the result comes back within onActivityResult method. requestCode is used for differentiation of returned results, resultCode - allows to determine if the result of call is successful.
Let’s create a new project:
Project name: P0301_ActivityResult
Build Target: Android 2.3.3
Application name: ActivityResult
Package name: ru.startandroid.develop.p0301activityresult
Create Activity: MainActivity
Code main screen in main.xml:
<?xml version="1.0" encoding="utf-8"?>
<LinearLayout
    xmlns:android="http://schemas.android.com/apk/res/android"
    android:layout_width="fill_parent"
    android:layout_height="fill_parent"
    android:orientation="vertical">
    <TextView
        android:id="@+id/tvText"
        android:layout_width="fill_parent"
        android:layout_height="wrap_content"
        android:layout_marginTop="20dp"
        android:gravity="center_horizontal"
        android:text="Hello World"
        android:textSize="20sp">
    </TextView>
    <LinearLayout
        android:id="@+id/linearLayout1"
        android:layout_width="match_parent"
        android:layout_height="wrap_content"
        android:layout_margin="20dp"
        android:orientation="horizontal">
        <Button
            android:id="@+id/btnColor"
            android:layout_width="match_parent"
            android:layout_height="wrap_content"
            android:layout_marginRight="5dp"
            android:layout_weight="1"
            android:text="Color">
        </Button>
        <Button
            android:id="@+id/btnAlign"
            android:layout_width="match_parent"
            android:layout_height="wrap_content"
            android:layout_marginLeft="5dp"
            android:layout_weight="1"
            android:text="Alignment">
        </Button>
    </LinearLayout>
</LinearLayout>
There are TextView with text and two buttons for color choosing and text alignment on the screen. Clicking the button, we will launch an activity for choice making and get the choice result back.
Let’s begin coding within MainActivity.java:
package ru.startandroid.develop.p0301activityresult;

import android.app.Activity;
import android.os.Bundle;
import android.view.View;
import android.view.View.OnClickListener;
import android.widget.Button;
import android.widget.TextView;

public class MainActivity extends Activity implements OnClickListener {

  TextView tvText;
  Button btnColor;
  Button btnAlign;

    /** Called when the activity is first created. */
    @Override
    public void onCreate(Bundle savedInstanceState) {
        super.onCreate(savedInstanceState);
        setContentView(R.layout.main);

        tvText = (TextView) findViewById(R.id.tvText);

        btnColor = (Button) findViewById(R.id.btnColor);
        btnAlign = (Button) findViewById(R.id.btnAlign);

        btnColor.setOnClickListener(this);
        btnAlign.setOnClickListener(this);

    }

  @Override
  public void onClick(View v) {
    // TODO Auto-generated method stub

  }
}
Here we determine views, set listeners for buttons and let’s finish with it for a while.
Let’s create another two activities. We will begin with the color-choosing activity. Create color.xml layout:
<?xml version="1.0" encoding="utf-8"?>
<LinearLayout
    xmlns:android="http://schemas.android.com/apk/res/android"
    android:layout_width="match_parent"
    android:layout_height="match_parent"
    android:orientation="horizontal">
    <Button
        android:id="@+id/btnRed"
        android:layout_width="match_parent"
        android:layout_height="wrap_content"
        android:layout_margin="5dp"
        android:layout_weight="1"
        android:text="Red">
    </Button>
    <Button
        android:id="@+id/btnGreen"
        android:layout_width="match_parent"
        android:layout_height="wrap_content"
        android:layout_margin="5dp"
        android:layout_weight="1"
        android:text="Green">
    </Button>
    <Button
        android:id="@+id/btnBlue"
        android:layout_width="match_parent"
        android:layout_height="wrap_content"
        android:layout_margin="5dp"
        android:layout_weight="1"
        android:text="Blue">
    </Button>
</LinearLayout>
Create class ColorActivity. ColorActivity.java:
package ru.startandroid.develop.p0301activityresult;

import android.app.Activity;
import android.content.Intent;
import android.graphics.Color;
import android.os.Bundle;
import android.view.View;
import android.view.View.OnClickListener;
import android.widget.Button;

public class ColorActivity extends Activity implements OnClickListener {

  Button btnRed;
  Button btnGreen;
  Button btnBlue;

  @Override
  protected void onCreate(Bundle savedInstanceState) {
    super.onCreate(savedInstanceState);
    setContentView(R.layout.color);

    btnRed = (Button) findViewById(R.id.btnRed);
    btnGreen = (Button) findViewById(R.id.btnGreen);
    btnBlue = (Button) findViewById(R.id.btnBlue);

    btnRed.setOnClickListener(this);
    btnGreen.setOnClickListener(this);
    btnBlue.setOnClickListener(this);
  }

  @Override
  public void onClick(View v) {
    Intent intent = new Intent();
    switch (v.getId()) {
    case R.id.btnRed:
      intent.putExtra("color", Color.RED);
      break;
    case R.id.btnGreen:
      intent.putExtra("color", Color.GREEN);
      break;
    case R.id.btnBlue:
      intent.putExtra("color", Color.BLUE);
      break;
    }
    setResult(RESULT_OK, intent);
    finish();
  }
}
As usual, we determine views, set listeners for buttons and override onClick. Within onClick we create an Intent, then we identify which color-button were clicked, and put a color object with a color value into Intent. Set status with RESULT_OK, set intent to be returned as a result and call finish(). We use system constants as color values.
We create activity for alline choosing the same way.
align.xml layout:
<?xml version="1.0" encoding="utf-8"?>
<LinearLayout
    xmlns:android="http://schemas.android.com/apk/res/android"
    android:layout_width="match_parent"
    android:layout_height="match_parent"
    android:orientation="horizontal">
    <Button
        android:id="@+id/btnLeft"
        android:layout_width="match_parent"
        android:layout_height="wrap_content"
        android:layout_margin="5dp"
        android:layout_weight="1"
        android:text="Left">
    </Button>
    <Button
        android:id="@+id/btnCenter"
        android:layout_width="match_parent"
        android:layout_height="wrap_content"
        android:layout_margin="5dp"
        android:layout_weight="1"
        android:text="Center">
    </Button>
    <Button
        android:id="@+id/btnRight"
        android:layout_width="match_parent"
        android:layout_height="wrap_content"
        android:layout_margin="5dp"
        android:layout_weight="1"
        android:text="Right">
    </Button>
</LinearLayout>
AlignActivity.java:
package ru.startandroid.develop.p0301activityresult;

import android.app.Activity;
import android.content.Intent;
import android.os.Bundle;
import android.view.Gravity;
import android.view.View;
import android.view.View.OnClickListener;
import android.widget.Button;

public class AlignActivity extends Activity implements OnClickListener {

  Button btnLeft;
  Button btnCenter;
  Button btnRight;

  @Override
  protected void onCreate(Bundle savedInstanceState) {
    super.onCreate(savedInstanceState);
    setContentView(R.layout.align);

    btnLeft = (Button) findViewById(R.id.btnLeft);
    btnCenter = (Button) findViewById(R.id.btnCenter);
    btnRight = (Button) findViewById(R.id.btnRight);

    btnLeft.setOnClickListener(this);
    btnCenter.setOnClickListener(this);
    btnRight.setOnClickListener(this);
  }

  @Override
  public void onClick(View v) {
    Intent intent = new Intent();
    switch (v.getId()) {
    case R.id.btnLeft:
      intent.putExtra("alignment", Gravity.LEFT);
      break;
    case R.id.btnCenter:
      intent.putExtra("alignment", Gravity.CENTER);
      break;
    case R.id.btnRight:
      intent.putExtra("alignment", Gravity.RIGHT);
      break;
    }
    setResult(RESULT_OK, intent);
    finish();
  }
}
It is similar to ColorActivity, though it’s not a color we are working with but with an alignment. Do not forget to declare both activities in manifest.
Now we can finish with MainActivity.java code. Let’s declare a pair of constant variables within our class for ease of use:
  final int REQUEST_CODE_COLOR = 1;
  final int REQUEST_CODE_ALIGN = 2;
We will use them, as a requestCode further.
Let’s finish with onClick method:
  @Override
  public void onClick(View v) {
    Intent intent;
    switch (v.getId()) {
    case R.id.btnColor:
      intent = new Intent(this, ColorActivity.class);
      startActivityForResult(intent, REQUEST_CODE_COLOR);
      break;
    case R.id.btnAlign:
      intent = new Intent(this, AlignActivity.class);
      startActivityForResult(intent, REQUEST_CODE_ALIGN);
      break;
    }
  }
Here we identify which button was clicked and send an intent waiting for result. Calls are different by Activity classes and requestCode variable in startActivityForResult method. Calling ColorActivity, we use REQUEST_CODE_COLOR constant, and REQUEST_CODE_ALIGN is used for AlignActivity call. We will get this constants back within onActivityResult and will identify an activity which returned result with it.
Let’s implement onActivityResult within MainActiivty.java:
  @Override
  protected void onActivityResult(int requestCode, int resultCode, Intent data) {
    // put in log requestCode and resultCode values
    Log.d("myLogs", "requestCode = " + requestCode + ", resultCode = " + resultCode);
    // if we got OK
    if (resultCode == RESULT_OK) {
      switch (requestCode) {
      case REQUEST_CODE_COLOR:
        int color = data.getIntExtra("color", Color.WHITE);
        tvText.setTextColor(color);
        break;
      case REQUEST_CODE_ALIGN:
        int align = data.getIntExtra("alignment", Gravity.LEFT);
        tvText.setGravity(align);
        break;
      }
    // if we didn’t get OK
    } else {
      Toast.makeText(this, "Wrong result", Toast.LENGTH_SHORT).show();
    }
  }
Logging variable values will make code run more visual.
Remember, that we set RESULT_OK constant as an argument for ColorActivity’s and AlignActivity’s setResult method. That means, that we should receive this variable within onActivityResult, as a result of successful call completion.
If the call was successful (resultCode = RESULT_OK), we must check the requestCode value. In case it’s equal to REQUEST_CODE_COLOR constant, which we used as an argument for startActivityForResult method within request for the color value, that means we have got the chosen value. Now we extract the color object from intent and set TextView color value with it. Color.WHITE constant argument within getIntExtra method is a default value. In case intent doesn’t content color object, a default value will be used.
REQUEST_CODE_ALIGN usage is similar. This constant we used within the align request. In case onActivityResult method’s requestCode variable is equal to REQUEST_CODE_ALIGN constant, that means we received result of the align request. So we extract this result from the Intent and set the TextView Gravity attribute with it.
If the resultCode is not equal to RESULT_OK, that means something went wrong. We will display appropriate message. It may happen in case clicking back button instead of making a choice.
Let’s save and launch our app.

Click the Color button
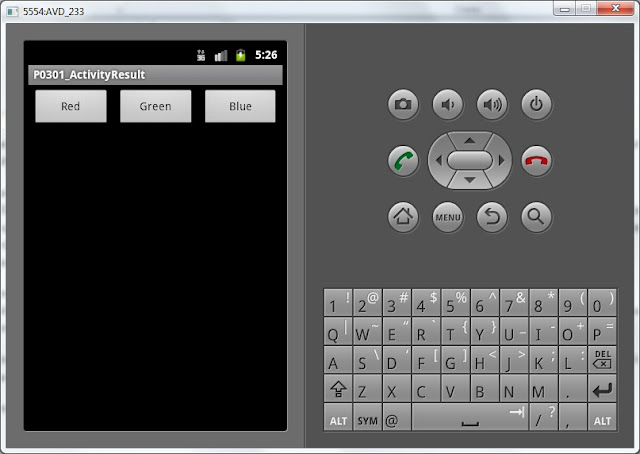
Click the red button.
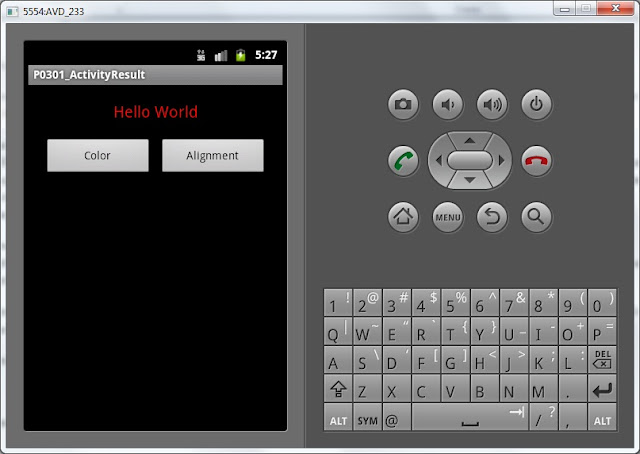
Color has changed now
Let’s look in Logs:
requestCode = 1, resultCode = -1
requestCode that was passed to onActivityResult is equal to one. All right, that is REQUEST_CODE_COLOR value, that we used within request.
resultCode = -1 – system RESULT_OK constant value.
So, it’s all right, we got response for the color request, and it’s status is equal to RESULT_OK.
Now we click Alignment button and choose Right, this way we get a right align:

Let’s look in Logs:
requestCode = 2, resultCode = -1
requestCode = 2, it’s equals to REQUEST_CODE_ALIGN. That means we’ve got response for align request.
resultCode = -1, i. e RESULT_OK.
Push Color button again
and then push back button, except of color choice button
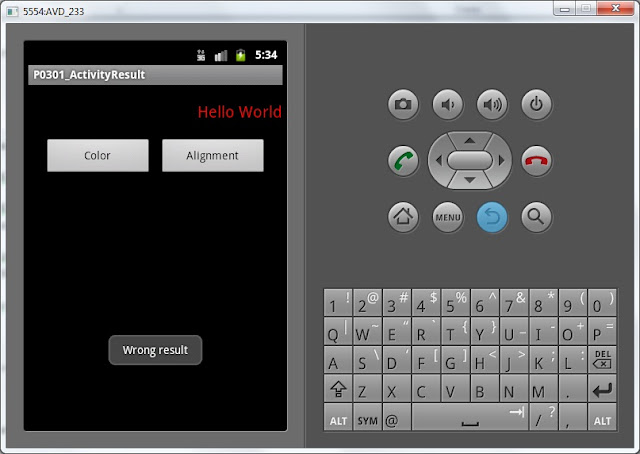
Our error toast is displayed. Let’s look in Logs:
requestCode = 1, resultCode = 0
requestCode = 1, that’s all right, we made a color request (REQUEST_CODE_COLOR).
resultCode = 0, this is RESULT_CANCELED constant value, so that means that request failed.
There is no constraints for status value in the setResult method. RESULT_OK and RESULT_CANCELLED are system constants, but you are allowed to use your own values if you need.
So. let’s sum up:
requestCode is a kind of request id. It must be set in the startActivityForResult method and checked within onActivityResult to know which query was processed
resultCode is a request status. It must be set in the setResult method and checked in onActivityResult to find out if the call was successful. RESULT_CANCELED constant will be returned if something went wrong.
MainActivity.java code:
package ru.startandroid.develop.p0301activityresult;

import android.app.Activity;
import android.content.Intent;
import android.graphics.Color;
import android.os.Bundle;
import android.util.Log;
import android.view.Gravity;
import android.view.View;
import android.view.View.OnClickListener;
import android.widget.Button;
import android.widget.TextView;
import android.widget.Toast;

public class MainActivity extends Activity implements OnClickListener {

  final int REQUEST_CODE_COLOR = 1;
  final int REQUEST_CODE_ALIGN = 2;

  TextView tvText;
  Button btnColor;
  Button btnAlign;

  /** Called when the activity is first created. */
  @Override
  public void onCreate(Bundle savedInstanceState) {
    super.onCreate(savedInstanceState);
    setContentView(R.layout.main);

    tvText = (TextView) findViewById(R.id.tvText);

    btnColor = (Button) findViewById(R.id.btnColor);
    btnAlign = (Button) findViewById(R.id.btnAlign);

    btnColor.setOnClickListener(this);
    btnAlign.setOnClickListener(this);
  }

  @Override
  public void onClick(View v) {
    Intent intent;
    switch (v.getId()) {
    case R.id.btnColor:
      intent = new Intent(this, ColorActivity.class);
      startActivityForResult(intent, REQUEST_CODE_COLOR);
      break;
    case R.id.btnAlign:
      intent = new Intent(this, AlignActivity.class);
      startActivityForResult(intent, REQUEST_CODE_ALIGN);
      break;
    }
  }

  @Override
  protected void onActivityResult(int requestCode, int resultCode, Intent data) {
    // put in log requestCode and resultCode values
    Log.d("myLogs", "requestCode = " + requestCode + ", resultCode = " + resultCode);
    // if we got OK
    if (resultCode == RESULT_OK) {
      switch (requestCode) {
      case REQUEST_CODE_COLOR:
        int color = data.getIntExtra("color", Color.WHITE);
        tvText.setTextColor(color);
        break;
      case REQUEST_CODE_ALIGN:
        int align = data.getIntExtra("alignment", Gravity.LEFT);
        tvText.setGravity(align);
        break;
      }
      // if we didn’t get OK
    } else {
      Toast.makeText(this, "Wrong result", Toast.LENGTH_SHORT).show();
    }
  }
}
Next lesson:
- find out what URI is;
- launch system apps (browser, dialer, map)
Присоединяйтесь к нам в Telegram:
- в канале StartAndroid публикуются ссылки на новые статьи с сайта startandroid.ru и интересные материалы с хабра, medium.com и т.п.
- в чатах решаем возникающие вопросы и проблемы по различным темам: Android, Compose, Kotlin, RxJava, Dagger, Тестирование, Performance
- ну и если просто хочется поговорить с коллегами по разработке, то есть чат Флудильня

")