In this lesson we will:
- learn state changes by example with two Activities
Translated by Taras Leskiv (http://android-by-example.blogspot.com/)
In the previous lesson we have looked through which states does Activity pass and which method are invoked during its lifetime. But we have seen an Activity only in the Resumed state (it means Activity is visible and focused). In this lesson, using two Activities, we will try to understand in which cases Activity can remain in the Stopped state (it is not visible and not focused, but it exists in memory).
Let’s create a project:
Project name: P0241_TwoActivityState
Build Target: Android 2.3.3
Application name: TwoActivityState
Package name: ru.startandroid.develop.p0241twoactivitystate
Create Activity: MainActivity
Write the following in main.xml:
<?xml version="1.0" encoding="utf-8"?>
<LinearLayout
xmlns:android="http://schemas.android.com/apk/res/android"
android:orientation="vertical"
android:layout_width="fill_parent"
android:layout_height="fill_parent">
<TextView
android:layout_width="fill_parent"
android:layout_height="wrap_content"
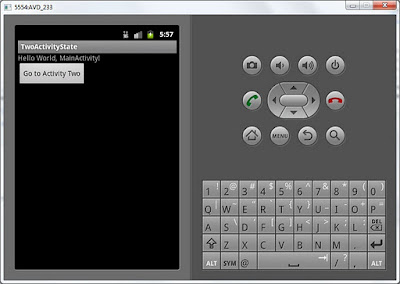
android:text="Hello World, MainActivity!">
</TextView>
<Button
android:layout_width="wrap_content"
android:layout_height="wrap_content"
android:text="Go to Activity Two"
android:id="@+id/btnActTwo">
</Button>
</LinearLayout>
"Go to Activity Two" button will invoke the second Activity.
Open MainActivity.java and write there all methods, including onRestart this time, and write log entries inside these methods. We also find and define the button and assign a listener to it. Do not write anything inside onClick method for now.
package ru.startandroid.develop.p0241twoactivitystate;

import android.app.Activity;
import android.content.Intent;
import android.os.Bundle;
import android.util.Log;
import android.view.View;
import android.view.View.OnClickListener;
import android.widget.Button;

public class MainActivity extends Activity implements OnClickListener {

  final String TAG = "States";

  Button btnActTwo;

  @Override
  public void onCreate(Bundle savedInstanceState) {
    super.onCreate(savedInstanceState);
    setContentView(R.layout.main);

    btnActTwo = (Button) findViewById(R.id.btnActTwo);
    btnActTwo.setOnClickListener(this);

    Log.d(TAG, "MainActivity: onCreate()");
  }

  @Override
  protected void onRestart() {
    super.onRestart();
    Log.d(TAG, "MainActivity: onRestart()");
  }

  @Override
  protected void onStart() {
    super.onStart();
    Log.d(TAG, "MainActivity: onStart()");
  }

  @Override
  protected void onResume() {
    super.onResume();
    Log.d(TAG, "MainActivity: onResume()");
  }

  @Override
  protected void onPause() {
    super.onPause();
    Log.d(TAG, "MainActivity: onPause()");
  }

  @Override
  protected void onStop() {
    super.onStop();
    Log.d(TAG, "MainActivity: onStop()");
  }

  @Override
  protected void onDestroy() {
    super.onDestroy();
    Log.d(TAG, "MainActivity: onDestroy()");
  }

  @Override
  public void onClick(View v) {
  }
}
In the previous lesson we have seen which methods and in which order are invoked while working with one Activity. Now we are interested in behaviour having two Activities, that’s why we create the second Activity. Let’s name it ActivityTwo. Remember the previous lessons: we have to create a class with the same name which is a subclass of android.app.Activity and register the new Activity inside the manifest-file. We also need to create a layout-file, name it two.xml and fill it in with the following code:
<?xml version="1.0" encoding="utf-8"?>
<LinearLayout
    xmlns:android="http://schemas.android.com/apk/res/android"
    android:orientation="vertical"
    android:layout_width="match_parent"
    android:layout_height="match_parent">
    <TextView
        android:id="@+id/textView1"
        android:layout_width="wrap_content"
        android:layout_height="wrap_content"
        android:text="This is Activity Two">
    </TextView>
</LinearLayout>
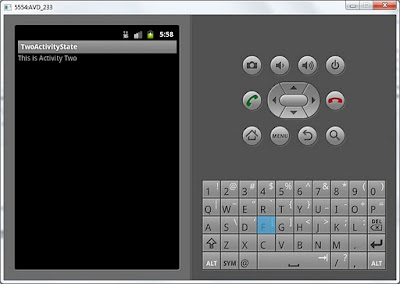
We have just a TextView with some text to be clear that this is ActivityTwo.
Create a class. ActivityTwo.java code:
package ru.startandroid.develop.p0241twoactivitystate;


import android.app.Activity;
import android.os.Bundle;
import android.util.Log;

public class ActivityTwo extends Activity {

  final String TAG = "States";

  @Override
  public void onCreate(Bundle savedInstanceState) {
    super.onCreate(savedInstanceState);
    setContentView(R.layout.two);
    Log.d(TAG, "ActivityTwo: onCreate()");
  }

  @Override
  protected void onRestart() {
    super.onRestart();
    Log.d(TAG, "ActivityTwo: onRestart()");
  }

  @Override
  protected void onStart() {
    super.onStart();
    Log.d(TAG, "ActivityTwo: onStart()");
  }

  @Override
  protected void onResume() {
    super.onResume();
    Log.d(TAG, "ActivityTwo: onResume()");
  }

  @Override
  protected void onPause() {
    super.onPause();
    Log.d(TAG, "ActivityTwo: onPause()");
  }

  @Override
  protected void onStop() {
    super.onStop();
    Log.d(TAG, "ActivityTwo: onStop()");
  }

  @Override
  protected void onDestroy() {
    super.onDestroy();
    Log.d(TAG, "ActivityTwo: onDestroy()");
  }
}
Don’t forget to add the record about ActivityTwo to the manifest. And now we can add the onClick method code to MainActivity.java, invoking ActivityTwo there
  @Override
  public void onClick(View v) {
    Intent intent = new Intent(this, ActivityTwo.class);
    startActivity(intent);
  }
(add only the highlighted code).
Log filter should remain from the previous lesson. We will use it. If not, create the filter by the tag States.
Save everything and run the application.
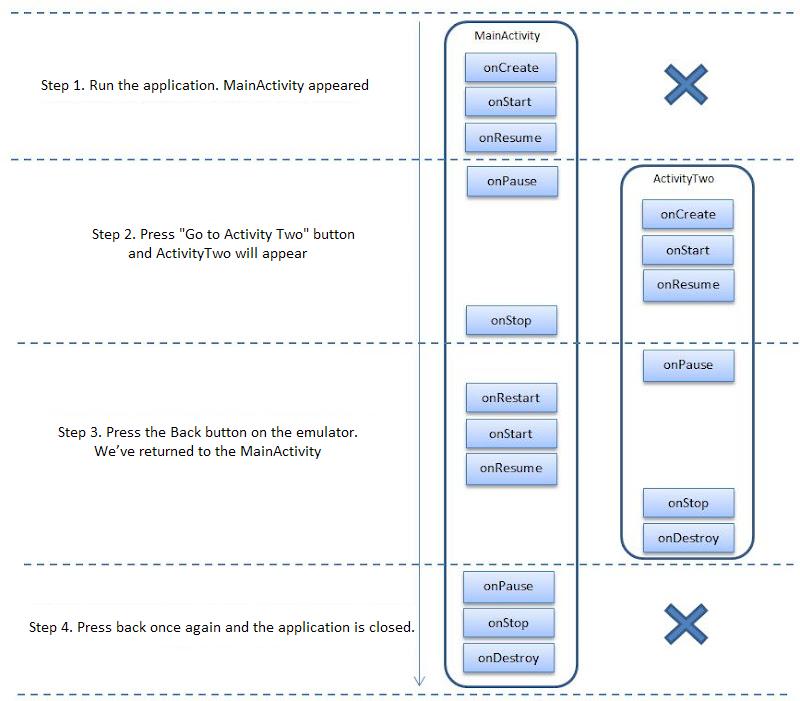
Step 1. Run the application. MainActivity appeared.

Logs:
MainActivity: onCreate()
MainActivity: onStart()
MainActivity: onResume()
Everything as the previous time - three methods are invoked. Activity goes through Stopped, Paused states and remains in the Resumed state.
Step 2. Press "Go to Activity Two" button and ActivityTwo will appear.
Logs:
MainActivity: onPause()
ActivityTwo: onCreate()
ActivityTwo: onStart()
ActivityTwo: onResume()
MainActivity: onStop()
Let’s look through it. MainActivty.onPause invocation means that MainActivity loses its focus and goes to Pause state. After this, ActivityTwo is created (onCreate), displayed (onStart) and receives focus (onResume). After this MainActivity is not visible any more (onStop). Note, that onDestroy is not invoked for MainActivity and it means it is not destroyed. MainActivity remains in memory in the Stopped state. And ActivityTwo - is in the Resumed state. It is visible and focused, we can interact with it.
Step 3. Press the Back button on the emulator. We’ve returned to the MainActivity.
Logs:
ActivityTwo: onPause()
MainActivity: onRestart()
MainActivity: onStart()
MainActivity: onResume()
ActivityTwo: onStop()
ActivityTwo: onDestroy()
ActivityTwo.onPause means that ActivityTwo loses its focus and goes to the Paused state. MainActivity now has to be restored from the Stopped state. In the end of the previous lesson I’ve written: "onRestart method is invoked before the onStart method, if Activity is not created from scratch, but restored from the Stopped state" - this is exactly our case, MainActivity hasn’t been killed by the system, it was still in memory. That is why MainActivity.onRestart is invoked. After this MainActivity.onStart and MainActivity.onResume are invoked - it means MainActivity went to Paused state (was displayed) and Resumed state (gained focus). And onStop and onDestroy methods invocation means that ActivityTwo changed its state to Stopped (was not visible any more) and has been destroyed.
Step 4. Press back once again and the application is closed.
Logs:
MainActivity: onPause()
MainActivity: onStop()
MainActivity: onDestroy()
Logs show that MainActivity changed its state to Paused, Stopped and has been destroyed.
If it is not clear from the fis time, try to repeat the algorithm for several times and check it with the diagram from the previous lesson. It is quite obvious and it will help you to get through. Try to draw the whole diagram on the sheet of paper and changes of the Activity state. I will also display the sequence of steps here to make it obvious.
We found out that Activity is not necessarily destroyed when it is not visible and can be stored in RAM. Looking through this, I guess a question has appeared: why in the step 2 MainActivity disappeared from the screen, but was left in memory and was not destroyed? But in the step 3 ActivityTwo was destroyed just after it disappeared from the screen. And in the step 4 in the end MainActivity was destroyed. Why is step 2 exceptional?
We will talk about this in the next lesson, as this lesson is already quite complicated. But the topic is extremely important and is one of the key concepts of the Android operating system.
In the next lesson:
- some theory about Task
- fixing Activity in the Paused state
Присоединяйтесь к нам в Telegram:
- в канале StartAndroid публикуются ссылки на новые статьи с сайта startandroid.ru и интересные материалы с хабра, medium.com и т.п.
- в чатах решаем возникающие вопросы и проблемы по различным темам: Android, Compose, Kotlin, RxJava, Dagger, Тестирование, Performance
- ну и если просто хочется поговорить с коллегами по разработке, то есть чат Флудильня

")