In this lesson we will:
- add components to the screen while application is running
Translated by Taras Leskiv (http://android-by-example.blogspot.com/)
In the previous lesson we were creating components in Activity.onCreate method, that is when creating the application. In this lesson we will create components while the application is running. We will be creating Buttons as they are displayed the most obviously. We will specify the text that will be displayed on the button and its alignment: left, center or right. We will also consider the deletion of the created components.
Let’s create a project:
Project name: P0171_DynamicLayout2
Build Target: Android 2.3.3
Application name: DynamicLayout2
Package name: ru.startandroid.develop.dynamiclayout2
Create Activity: MainActivity
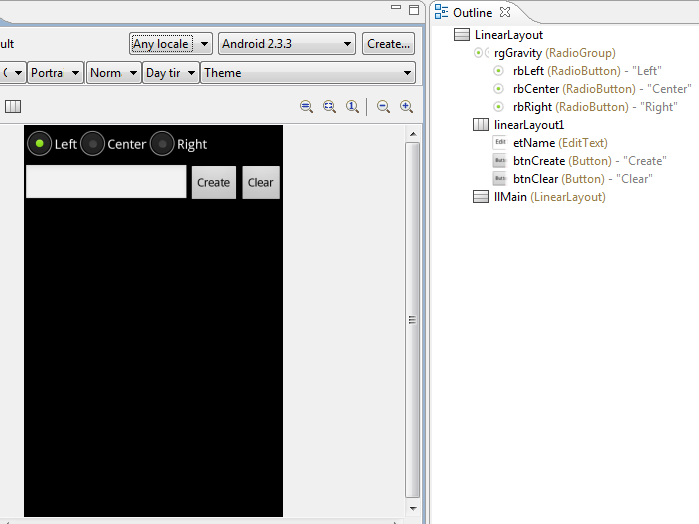
Create a screen that will help us creating View-components. Open main.xml and write the following there:
<?xml version="1.0" encoding="utf-8"?>
<LinearLayout
	xmlns:android="http://schemas.android.com/apk/res/android"
	android:orientation="vertical"
	android:layout_width="fill_parent"
	android:layout_height="fill_parent">
	<RadioGroup
		android:layout_height="wrap_content"
		android:layout_width="match_parent"
		android:orientation="horizontal"
		android:id="@+id/rgGravity">
		<RadioButton
			android:layout_height="wrap_content"
			android:layout_width="wrap_content"
			android:checked="true"
			android:text="Left"
			android:id="@+id/rbLeft">
		</RadioButton>
		<RadioButton
			android:layout_height="wrap_content"
			android:layout_width="wrap_content"
			android:text="Center"
			android:id="@+id/rbCenter">
		</RadioButton>
		<RadioButton
			android:layout_height="wrap_content"
			android:layout_width="wrap_content"
			android:text="Right"
			android:id="@+id/rbRight">
		</RadioButton>
	</RadioGroup>
	<LinearLayout
		android:id="@+id/linearLayout1"
		android:layout_width="match_parent"
		android:orientation="horizontal"
		android:layout_height="wrap_content">
		<EditText
			android:layout_height="wrap_content"
			android:layout_width="wrap_content"
			android:layout_weight="1"
			android:id="@+id/etName"
			android:fadeScrollbars="true">
		</EditText>
		<Button
			android:layout_width="wrap_content"
			android:layout_height="wrap_content"
			android:text="Create"
			android:id="@+id/btnCreate">
		</Button>
		<Button
			android:layout_width="wrap_content"
			android:layout_height="wrap_content"
			android:text="Clear"
			android:id="@+id/btnClear">
		</Button>
	</LinearLayout>
	<LinearLayout
		android:layout_width="match_parent"
		android:layout_height="match_parent"
		android:id="@+id/llMain"
		android:orientation="vertical">
	</LinearLayout>
</LinearLayout>
Let’s examine the screen.
rgGravity - this is a RadioGroup with three RadioButtons (rbLeft, rbCenter, rbRight). We will use this component to select the alignment of the created component.
etName - a text field, here we specify text that will be displayed on the created component.
btnCreate - button which launches the creation process.
btnClear - button, which deletes everything that we have created
llMain - vertical LinearLayout, in which components will be created
The screen is ready, let’s code the implementation. Open MainActivity.java. We will start by defining and finding all the required components. By the way, we have a few buttons that we will be using, so they need a listener. We will assign Activity as a listener (we need to add implements onClickListener) and create an empty (for now) onClick processing method:
public class MainActivity extends Activity implements OnClickListener{

  LinearLayout llMain;
  RadioGroup rgGravity;
  EditText etName;
  Button btnCreate;
  Button btnClear;

int wrapContent = LinearLayout.LayoutParams.WRAP_CONTENT;


  /** Called when the activity is first created. */
  @Override
  public void onCreate(Bundle savedInstanceState) {
    super.onCreate(savedInstanceState);
    setContentView(R.layout.main);

    llMain = (LinearLayout) findViewById(R.id.llMain);
    rgGravity = (RadioGroup) findViewById(R.id.rgGravity);
    etName = (EditText) findViewById(R.id.etName);

    btnCreate = (Button) findViewById(R.id.btnCreate);
    btnCreate.setOnClickListener(this);

    btnClear = (Button) findViewById(R.id.btnClear);
    btnClear.setOnClickListener(this);
  }


  @Override
  public void onClick(View v) {
    // TODO Auto-generated method stub

  }
}
I’ve also created wrapContent variable and will store LinearLayout.LayoutParams.WRAP_CONTENT value in it to make the code less verbose.
Now let’s describe the process of creating a Button-component by filling in the onClick method:
@Override
  public void onClick(View v) {
    switch (v.getId()) {
    case R.id.btnCreate:
      // creating LayoutParams with width and height defined by content
      LinearLayout.LayoutParams lParams = new LinearLayout.LayoutParams(
          wrapContent, wrapContent);
      // a variable to store alignment, will be LEFT by default
      int btnGravity = Gravity.LEFT;
      // define which RadioButton is checked and fill in bntGravity correspondingly
      switch (rgGravity.getCheckedRadioButtonId()) {
      case R.id.rbLeft:
        btnGravity = Gravity.LEFT;
        break;
      case R.id.rbCenter:
        btnGravity = Gravity.CENTER_HORIZONTAL;
        break;
      case R.id.rbRight:
        btnGravity = Gravity.RIGHT;
        break;
      }
      // put the received alignment value into LayoutParams
      lParams.gravity = btnGravity;

      // create a Button, change text and add it to the LinearLayout
      Button btnNew = new Button(this);
      btnNew.setText(etName.getText().toString());
      llMain.addView(btnNew, lParams);

      break;
    }
  }
Let’s look through the code. To begin with, we check whether btnCreate has been clicked - that is the creation button. Then we create LayoutParams with width and height defined by content. I am using here a variable that I mentioned before - wrapContent. It would have been quite verbose otherwise.
Then we create btnGravity variable and assign it alignment value LEFT by default. To define which RadioButton is checked at the moment, we will use getCheckedRadioButtonId method - it returns the ID of the checked RadioButton for a RadioGroup. We compare it to our three IDs and put the corresponding value into btnGravity variable. We assing this value to gravity in LayoutParams.
Then we create a button and assign it text from etName. Note that it is not sufficient to write getText as it doesn’t return text. You should also call toString method. And in the end add the created button to our LinearLayout.
Save everything and run the application. Add several buttons:
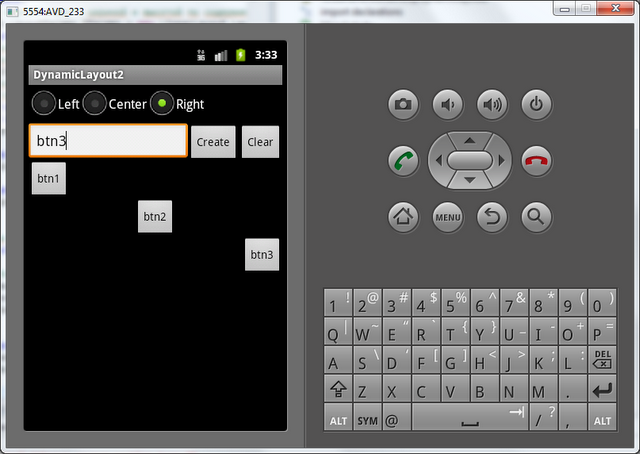
Buttons should appear with the specified alignment and text.
When you enter text, the keyboard appears at the bottom and blocks the view. To make it disappear, you have to press the Back button on emulator or Esc on the common keyboard. If the keyboard that appears is Japanese or with hieroglyphs, open the context menu for the input field (left mouse button long press), choose Input method and choose Android Keyboard from the list.
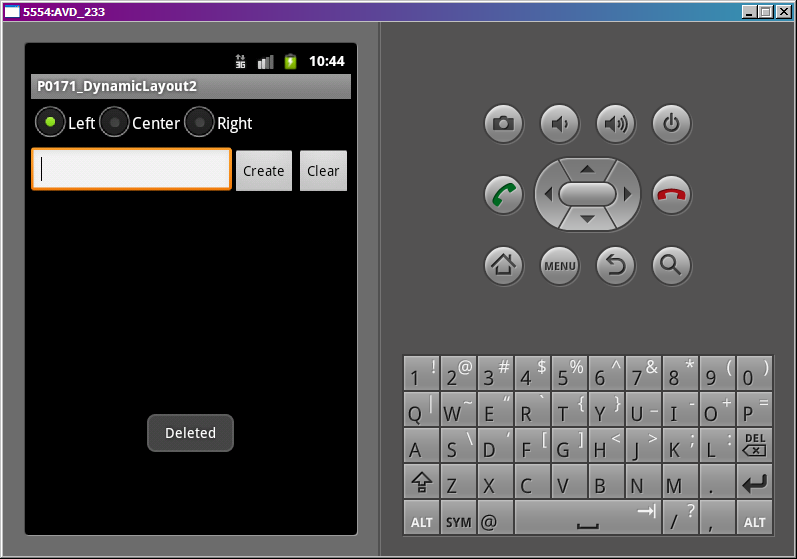
The only thing left unimplemented is Clear button, which is intended to delete all the created content. To do so we need to fill in the onClick method and add one more case to the switch statement (v.getId()):
    case R.id.btnClear:
      llMain.removeAllViews();
      Toast.makeText(this, "Deleted", Toast.LENGTH_SHORT).show();
      break;
removeAllViews method removes all the child View-components from our LinearLayout. We show a success message using Toast. Save, run and check. Add a few buttons, click Clear button and see the result:
Finally, we have a quite dynamic application which can change itself.
The complete lesson code:
public class MainActivity extends Activity implements OnClickListener {

  LinearLayout llMain;
  RadioGroup rgGravity;
  EditText etName;
  Button btnCreate;
  Button btnClear;

  int wrapContent = LinearLayout.LayoutParams.WRAP_CONTENT;

  /** Called when the activity is first created. */
  @Override
  public void onCreate(Bundle savedInstanceState) {
    super.onCreate(savedInstanceState);
    setContentView(R.layout.main);

    llMain = (LinearLayout) findViewById(R.id.llMain);
    rgGravity = (RadioGroup) findViewById(R.id.rgGravity);
    etName = (EditText) findViewById(R.id.etName);

    btnCreate = (Button) findViewById(R.id.btnCreate);
    btnCreate.setOnClickListener(this);

    btnClear = (Button) findViewById(R.id.btnClear);
    btnClear.setOnClickListener(this);
  }

  @Override
  public void onClick(View v) {
    switch (v.getId()) {
    case R.id.btnCreate:
      // creating LayoutParams with width and height defined by content
      LinearLayout.LayoutParams lParams = new LinearLayout.LayoutParams(
          wrapContent, wrapContent);
      // a variable to store alignment, will be LEFT by default
      int btnGravity = Gravity.LEFT;
      // define which RadioButton is checked and fill in bntGravity correspondingly
      switch (rgGravity.getCheckedRadioButtonId()) {
      case R.id.rbLeft:
        btnGravity = Gravity.LEFT;
        break;
      case R.id.rbCenter:
        btnGravity = Gravity.CENTER_HORIZONTAL;
        break;
      case R.id.rbRight:
        btnGravity = Gravity.RIGHT;
        break;
      }
      // put the received alignment value into LayoutParams
      lParams.gravity = btnGravity;

      // create a Button, change text and add it to the LinearLayout
      Button btnNew = new Button(this);
      btnNew.setText(etName.getText().toString());
      llMain.addView(btnNew, lParams);

      break;

    case R.id.btnClear:
      llMain.removeAllViews();
      Toast.makeText(this, "Deleted", Toast.LENGTH_SHORT).show();
      break;

    }
  }

}
In the next lesson we will:
- change layout-parameters for already existing screen components
Присоединяйтесь к нам в Telegram:
- в канале StartAndroid публикуются ссылки на новые статьи с сайта startandroid.ru и интересные материалы с хабра, medium.com и т.п.
- в чатах решаем возникающие вопросы и проблемы по различным темам: Android, Compose, Kotlin, RxJava, Dagger, Тестирование, Performance
- ну и если просто хочется поговорить с коллегами по разработке, то есть чат Флудильня

")