In this lesson we will:
- create menu items with IDs
- group and sort menu items
Translated by Taras Leskiv (http://android-by-example.blogspot.com/)
In the previous lesson we observed the simplest way of creating a menu using add(CharSequence title) method, we passed only text as a parameter. Let’s have a look at another implementation of this method - add(int groupId, int itemId, int order, CharSequence title). This methods takes 4 parameters:
groupId - group identifier to which a menu item belongs to
itemId - menu item ID
order - for specifying the order in which menu items will be shown
title - text that will be displayed
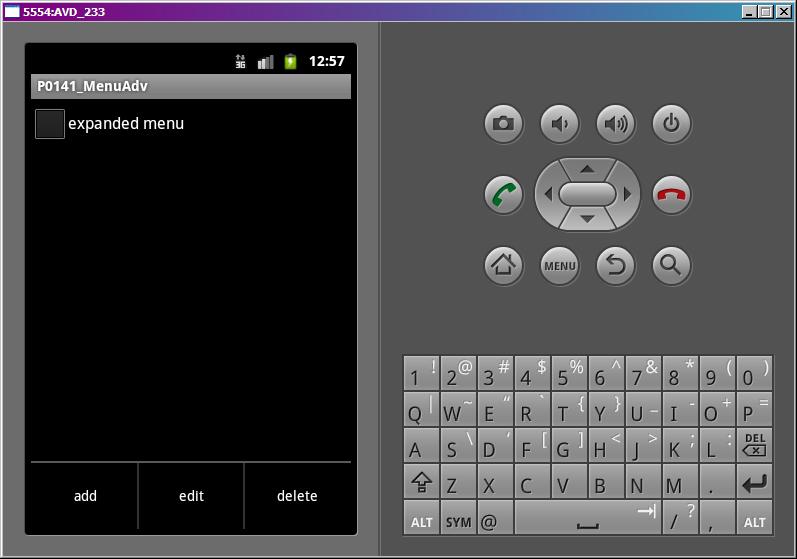
We will create an application to illustrate how all these parameters are used. There will be a TextView and a CheckBox on the screen:
- TextView will display which menu item was chosen
- CheckBox will define whether to show a simple or expanded menu. It will be implemented using menu groups.
Let me clarify that terms "simple menu" and "expanded menu" - are not Android terms, these are my namings. So when the application is running and the user clicks menu button, he will see a "simple" menu. If the user checks the CheckBox, the "expanded" menu which contains more items will be displayed.
Let’s create a project:
Project name: P0141_MenuAdv
Build Target: Android 2.3.3
Application name: MenuAdv
Package name: ru.startandroid.develop.menuadv
Create Activity: MainActivity
Open main.xml, assign the ID to an existing TextView, erase text in it and create a CheckBox. Code:
<?xml version="1.0" encoding="utf-8"?>
<LinearLayout
	xmlns:android="http://schemas.android.com/apk/res/android"
	android:orientation="vertical"
	android:layout_width="fill_parent"
	android:layout_height="fill_parent">
	<CheckBox
		android:layout_width="wrap_content"
		android:layout_height="wrap_content"
		android:id="@+id/chbExtMenu"
		android:text="expanded menu">
	</CheckBox>
	<TextView
		android:layout_width="fill_parent"
		android:layout_height="wrap_content"
		android:id="@+id/textView">
	</TextView>
</LinearLayout>
Open MainActivity.java and fill in MainActivity class with the following code:
public class MainActivity extends Activity {

  // Screen elements
  TextView tv;
  CheckBox chb;


    /** Called when the activity is first created. */
    @Override
    public void onCreate(Bundle savedInstanceState) {
        super.onCreate(savedInstanceState);
        setContentView(R.layout.main);
        // find the elements
        tv = (TextView) findViewById(R.id.textView);
        chb = (CheckBox) findViewById(R.id.chbExtMenu);

    }

    // menu creation
    @Override
    public boolean onCreateOptionsMenu(Menu menu) {
      // TODO Auto-generated method stub
      // adding menu items
      menu.add(0, 1, 0, "add");
      menu.add(0, 2, 0, "edit");
      menu.add(0, 3, 3, "delete");
      menu.add(1, 4, 1, "copy");
      menu.add(1, 5, 2, "paste");
      menu.add(1, 6, 4, "exit");

      return super.onCreateOptionsMenu(menu);
    }

    // menu update
    @Override
    public boolean onPrepareOptionsMenu(Menu menu) {
      // TODO Auto-generated method stub
      // menu items with group ID = 1 are visible if CheckBox is checked
      menu.setGroupVisible(1, chb.isChecked());
      return super.onPrepareOptionsMenu(menu);
    }

    // process clicks
    @Override
    public boolean onOptionsItemSelected(MenuItem item) {
      // TODO Auto-generated method stub
      StringBuilder sb = new StringBuilder();

      // print the info about pressed menu item
      sb.append("Item Menu");
      sb.append("\r\n groupId: " + String.valueOf(item.getGroupId()));
      sb.append("\r\n itemId: " + String.valueOf(item.getItemId()));
      sb.append("\r\n order: " + String.valueOf(item.getOrder()));
      sb.append("\r\n title: " + item.getTitle());
      tv.setText(sb.toString());

      return super.onOptionsItemSelected(item);
    }
}
Don’t forget to update imports (CTRL + SHIFT +O).
Let’s look through the code above. We use the following methods:
onCreateOptionsMenu - is invoked only when the menu is shown for the first time. Creates a menu and is not used any more. We add menu items here.
onPrepareOptionsMenu - invoked every time before displaying the menu. We make changes to the already existing menu if it is necessary.
onOptionsItemSelected - is invoked when the menu item is clicked. Here we define which menu item has been clicked.
In the onCreateOptionsMenu we add 6 menu items. Have a look at the add method parameters.
The first parameter is the group ID. For the first three items it equals 0, for the other three it equals 1. So the copy, paste and exit menu items are united into a group with ID = 1. Visually, it is not displayed in any way - they do not differ in color or something else. We will use group ID in onPrepareOptionsMenu implementation.
The second parameter is ID of menu item. It is used in listener to define which menu item has been pressed. We will use it in onOptionsItemSelected.
The third parameter defines the item position in the menu. This parameter is used for defining the order of menu items when it is displayed. The sort order is ascending, from smaller order to larger.
The fourth parameter is text, which will be displayed on the menu item. Everything is clear with it.
Menu object is passed to onPrepareOptionsMenu method and we can work with it. In the current example we invoke setGroupVisible. This method allows to hide\show menu items. It is passed two parameters - group ID and a boolean value. We write 1 for the group ID (the same group which contains copy, paste and exit menu items). We will use the CheckBox state as a boolean parameter. If it is checked, menu items (from the group where ID = 1) will be displayed, if not - items will not be displayed.
Let’s save everything and launch the application.
"Simple" menu:
"Expanded" menu
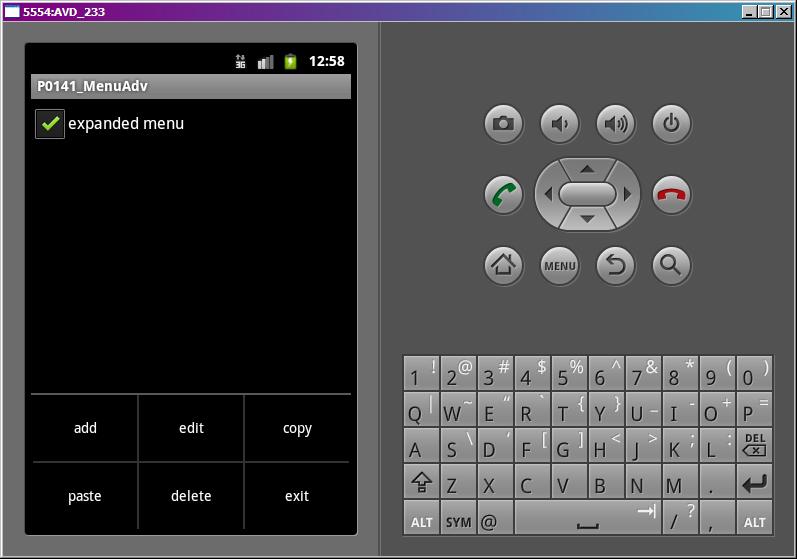
Depending on CheckBox state, 3 or 6 items in menu are visible.
Pay attention to the item order. They are sorted by order parameter ascending. If the order of several items is the same, these items will be positioned in the order of their creation in onCreateOptionsMenu method.
When pressing any menu item, onOptionsItemSelected method is triggered. In this method we output the information about the item pressed to the TextView. You can compare this information to those we have coded when creating menu items. All the parameters have to match. I’ve made the same order of items as in the add method for convenience: groupId, itemId, order, title.
Try to add some more items to the menu and have a look how they are displayed.
To simplify the code I’ve hardcoded numbers for group IDs and menu item IDs. Usually, it is recommended to use constants. I will use constants further.
XML-menu
There is one more convenient and preferable way of creating a menu - using an xml-file, the same as layout-file when creating a screen. To get a menu which we have created programmatically in this lesson, we will create mymenu.xml file in res/menu folder:
<?xml version="1.0" encoding="utf-8"?>
<menu
	xmlns:android="http://schemas.android.com/apk/res/android">
	<item
		android:id="@+id/menu_add"
		android:title="add">
	</item>
	<item
		android:id="@+id/menu_edit"
		android:title="edit">
	</item>
	<item
		android:id="@+id/menu_delete"
		android:orderInCategory="3"
		android:title="delete">
	</item>
	<group
		android:id="@+id/group1">
		<item
			android:id="@+id/menu_copy"
			android:orderInCategory="1"
			android:title="copy">
		</item>
		<item
			android:id="@+id/menu_paste"
			android:orderInCategory="2"
			android:title="paste">
		</item>
		<item
			android:id="@+id/menu_exit"
			android:orderInCategory="4"
			android:title="exit">
		</item>
	</group>
</menu>
item - is a menu item, group - group of items. In the ID attributes we use the same approach as with IDs of screen components - @+id/<your_ID> and Eclipse will generate these IDs in R.java. orderInCategory attribute is the order of items, title is a text of menu item.
Now we don’t need to hardcode the creation of each menu item, we will just connect menu, which is passed as a parameter to the onCreateOptionsMenu method and our xml-file:
  public boolean onCreateOptionsMenu(Menu menu) {
    getMenuInflater().inflate(R.menu.mymenu, menu);
    return super.onCreateOptionsMenu(menu);
  }
Using getMenuInflater method we obtain MenuInflater and invoke its inflate method. We pass our mymenu.xml file from res/menu folder and menu object as parameters. MenuInflater takes a menu object and fills it with menu items from mymenu.xml file.
if you want to hide a group, invoke the same setGroupVisible method and pass R.id.group1 as a parameter for group ID.
You can view attributes for menu xml-file in more details here.
I recommend you to try and test both ways of creating a menu. Creating menu programmatically is more flexible, but xml shrinks the code amount.
On the next lesson we will:
- create a context menu
Присоединяйтесь к нам в Telegram:
- в канале StartAndroid публикуются ссылки на новые статьи с сайта startandroid.ru и интересные материалы с хабра, medium.com и т.п.
- в чатах решаем возникающие вопросы и проблемы по различным темам: Android, Compose, Kotlin, RxJava, Dagger, Тестирование, Performance
- ну и если просто хочется поговорить с коллегами по разработке, то есть чат Флудильня

")