This lesson:
- using ListView for single and multiple choice
Sometimes we might have a necessity to allow the user to select one or several elements in the list. Let’s look how to do that.
Let’s create a project:
Project name: P0431_SimpleListChoice
Build Target: Android 2.3.3
Application name: SimpleListChoice
Package name: ru.startandroid.develop.p0431simplelistchoice
Create Activity: MainActivity
Let’s code main.xml:
<?xml version="1.0" encoding="utf-8"?>
<LinearLayout
    xmlns:android="http://schemas.android.com/apk/res/android"
    android:layout_width="fill_parent"
    android:layout_height="fill_parent"
    android:orientation="vertical">
    <Button
        android:id="@+id/btnChecked"
        android:layout_width="wrap_content"
        android:layout_height="wrap_content"
        android:text="Get checked items">
    </Button>
    <ListView
        android:id="@+id/lvMain"
        android:layout_width="match_parent"
        android:layout_height="wrap_content">
    </ListView>
</LinearLayout>
Here we have the lvMain list and the btnChecked button, clicking which we will display the chosen list items in logs.
Let’s remember that we have res files and we can use them. Let’s find the res file in our project (res/values/strings.xml) and add a string array with names into it. As a result we will get a file with such contents:
<?xml version="1.0" encoding="utf-8"?>
<resources>
    <string name="hello">Hello World, MainActivity!</string>
    <string name="app_name">SimpleListChoice</string>
    <string-array name="names">
        <item>Ivan</item>
        <item>Mary</item>
        <item>Petr</item>
        <item>Anton</item>
        <item>Dasha</item>
        <item>Boris</item>
        <item>Kotja</item>
        <item>Igor</item>
        <item>Anna</item>
        <item>Denis</item>
        <item>Vadim</item>
        <item>Olga</item>
        <item>Sergey</item>
    </string-array>
</resources>
We will get an array of names from this list. It’s more easier and more correct than to add all the array elements inside the java code.
Let’s code MainActivity.java:
package ru.startandroid.develop.p0431simplelistchoice;

import android.app.Activity;
import android.os.Bundle;
import android.util.Log;
import android.view.View;
import android.view.View.OnClickListener;
import android.widget.ArrayAdapter;
import android.widget.Button;
import android.widget.ListView;

public class MainActivity extends Activity implements OnClickListener {

  final String LOG_TAG = "myLogs";

  ListView lvMain;
  String[] names;

  /** Called when the activity is first created. */
  public void onCreate(Bundle savedInstanceState) {
    super.onCreate(savedInstanceState);
    setContentView(R.layout.main);

    lvMain = (ListView) findViewById(R.id.lvMain);
    // here we adjust list elements choice mode
    lvMain.setChoiceMode(ListView.CHOICE_MODE_SINGLE);
    // create adapter using array from resources file
    ArrayAdapter<CharSequence> adapter = ArrayAdapter.createFromResource(
        this, R.array.names,
        android.R.layout.simple_list_item_single_choice);
    lvMain.setAdapter(adapter);

    Button btnChecked = (Button) findViewById(R.id.btnChecked);
    btnChecked.setOnClickListener(this);

    // get array from resources file
    names = getResources().getStringArray(R.array.names);
  }

  public void onClick(View arg0) {
    // log selected element
    Log.d(LOG_TAG, "checked: " + names[lvMain.getCheckedItemPosition()]);
  }
}
We set CHOICE_MODE_SINGLE for the ListView. It means that the ListView will remember the position of the last item that was clicked and we will be able to make a request to get this information. Next, we create an adapter, but not through a normal constructor, but using the createFromResource method. The input parameters are almost the same with a normal constructor, but instead of a data array we will use the string array, which we have created earlier within the resources. We will use the system’s simple_list_item_single_choice as a layout-resource. It was just created for such use.
Next we find the btnChecked button and set the activity as it’s listener. And at the end we import our array of names from the resource file into an array of strings.
Within the onClick method we display the name from the array into logs. We use the position in list as an index. The order of elements in the array and in the list are the same.
Let’s save the project and launch it. We will see the list. Let’s select tany name
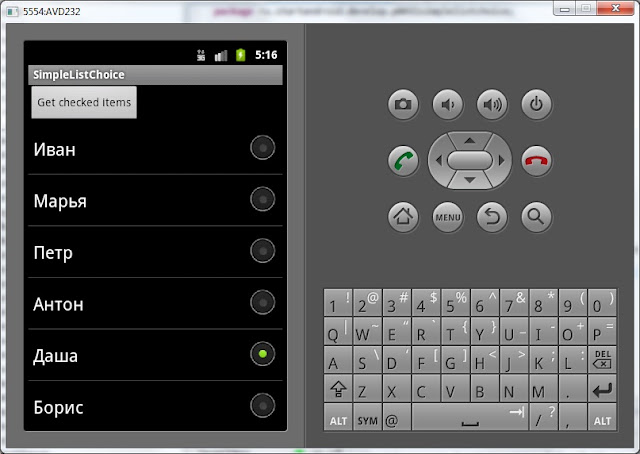
Now let’s click the Get checked items button and look in logs:
checked: Dasha
All right.
Now let’s refactor our code a little and get a listView with multiple choice.
    // устанавливаем режим выбора пунктов списка
    lvMain.setChoiceMode(ListView.CHOICE_MODE_MULTIPLE);
    // Создаем адаптер, используя массив из файла ресурсов
    ArrayAdapter<CharSequence> adapter = ArrayAdapter.createFromResource(
        this, R.array.names,
        android.R.layout.simple_list_item_multiple_choice);
We have changed CHOICE_MODE_SINGLE to CHOICE_MODE_MULTIPLE, and now the list will save the selected elements. We have also changed simple_list_item_single_choice to simple_list_item_multiple_choice, so the multiple choice would be allowed for the list now.
We will refactor the onClick method the next way:
  public void onClick(View arg0) {
    // пишем в лог выделенные элементы
    Log.d(LOG_TAG, "checked: ");
    SparseBooleanArray sbArray = lvMain.getCheckedItemPositions();
    for (int i = 0; i < sbArray.size(); i++) {
      int key = sbArray.keyAt(i);
      if (sbArray.get(key))
        Log.d(LOG_TAG, names[key]);
    }
  }
We get the 4elements positions as the SparseBooleanArray object. This is a Map(int, boolean). The key (int) is the element position, and the boolean variable means if the element was chosen nor not. SparseBooleanArray only contains data about the elements was chosen (or unchosen), but not about all the elements. We go through the array’s contents, get the element’s position and in case it was chosen, display in logs the name from the array, according to element’s position.
Now let’s save and launch the app. We will choose several elements:

Let’s click the Get checked items button and look in logs:
checked:
Maria
Anton
Kostja
The chosen elements were returned.
As we can see, the difference between a simple list and a list with the choice awability is only in different ChoiceMode modes and in different layout resources for the list items.
By the way, here we can see again what for we need the context in the adapter creating. The adapter won’t be able to get the resources without it. The adapter hasn’t the getResources method, so it uses the context which has this method.
The next lesson:
- we will take a look at the ListView events: click - onItemClick method, selection - onItemSelect method, scrolling - onScroll method
Присоединяйтесь к нам в Telegram:
- в канале StartAndroid публикуются ссылки на новые статьи с сайта startandroid.ru и интересные материалы с хабра, medium.com и т.п.
- в чатах решаем возникающие вопросы и проблемы по различным темам: Android, Compose, Kotlin, RxJava, Dagger, Тестирование, Performance
- ну и если просто хочется поговорить с коллегами по разработке, то есть чат Флудильня

")