In this lesson we will:
- look through application logs and Toast messages
Translated by Taras Leskiv (http://android-by-example.blogspot.com/)
Create a project:
Project name: P0121_LogAndMess
Build Target: Android 2.3.3
Application name: LogAndMess
Package name: ru.startandroid.develop.logandmess
Create Activity: MainActivity
Create a screen in main.xml that we are already familiar with from the lesson about listeners
<?xml version="1.0" encoding="utf-8"?>
<LinearLayout
	xmlns:android="http://schemas.android.com/apk/res/android"
	android:layout_width="match_parent"
	android:layout_height="match_parent"
	android:orientation="horizontal">
	<LinearLayout
		android:id="@+id/linearLayout1"
		android:layout_width="match_parent"
		android:layout_height="match_parent"
		android:layout_margin="30dp"
		android:orientation="vertical">
		<TextView
			android:id="@+id/tvOut"
			android:layout_width="wrap_content"
			android:layout_height="wrap_content"
			android:layout_gravity="center_horizontal"
			android:layout_marginBottom="50dp"
			android:text="TextView">
		</TextView>
		<Button
			android:id="@+id/btnOk"
			android:layout_width="100dp"
			android:layout_height="wrap_content"
			android:layout_gravity="center_horizontal"
			android:text="OK">
		</Button>
		<Button
			android:id="@+id/btnCancel"
			android:layout_width="100dp"
			android:layout_height="wrap_content"
			android:layout_gravity="center_horizontal"
			android:text="Cancel">
		</Button>
	</LinearLayout>
</LinearLayout>
The application algorithm will be the same. We will change text when the button is clicked. Activity is a listener.
public class MainActivity extends Activity implements OnClickListener {

  TextView tvOut;
  Button btnOk;
  Button btnCancel;

  /** Called when the activity is first created. */
  @Override
  public void onCreate(Bundle savedInstanceState) {
    super.onCreate(savedInstanceState);
    setContentView(R.layout.main);

    // find View-elements
    tvOut = (TextView) findViewById(R.id.tvOut);
    btnOk = (Button) findViewById(R.id.btnOk);
    btnCancel = (Button) findViewById(R.id.btnCancel);

    // assign listener to buttons
    btnOk.setOnClickListener(this);
    btnCancel.setOnClickListener(this);
  }

  @Override
  public void onClick(View v) {
    // define the button that invoked the listener by id
    switch (v.getId()) {
    case R.id.btnOk:
      // OK button
      tvOut.setText("OK button was clicked");
      break;
    case R.id.btnCancel:
      // Cancel button
      tvOut.setText("Cancel button was clicked");
      break;
    }
  }

}
Save and run the application. Make sure everything works fine
Application logs
When testing your application, you can see working logs. They are displayed in the LogCat window. To open LogCat go to Window > Show View > Other … In the window that appeared choose Android > LogCat.

The LogCat tab should appear
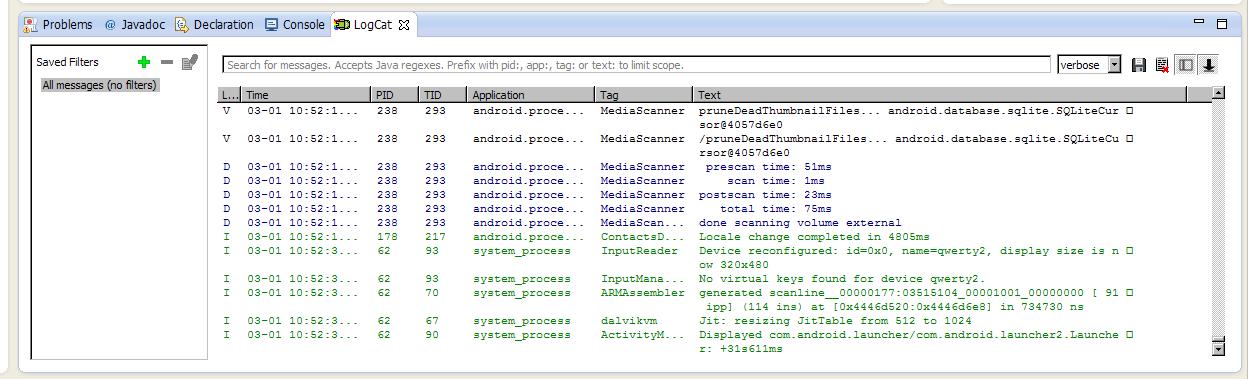
Let’s observe this tab in more detail. Logs have different importance levels: ERROR, WARN, INFO, DEBUG, VERBOSE (descending). Items in dropdown list (verbose, debug, ...) are filters and they correspond to log types. Test them and note that filter shows not only logs of its level, but also logs of higher importance. You can also create, edit and delete your own filters - we will examine this later on.
Let’s see how to write logs. It is really simple and it can be done using Log class and its Log.v(), Log.d(), Log.i(), Log.w() and Log.e() methods. Method names correspond to log levels which they write.
Let’s change MainActivity.java code. Take all the comments from code and add them as DEBUG-logs using log.d method. Method takes a tag and text of the message as parameters. Tag is something like a label, so you could later find your messages in the pile of system logs. Let’s add the tag description (TAG) and write all text from comments into logs.
public class MainActivity extends Activity implements OnClickListener {

  TextView tvOut;
  Button btnOk;
  Button btnCancel;

  private static final String TAG = "myLogs";

  /** Called when the activity is first created. */
  @Override
  public void onCreate(Bundle savedInstanceState) {
    super.onCreate(savedInstanceState);
    setContentView(R.layout.main);

    // find View-elements
    Log.d(TAG, "find View-elements");
    tvOut = (TextView) findViewById(R.id.tvOut);
    btnOk = (Button) findViewById(R.id.btnOk);
    btnCancel = (Button) findViewById(R.id.btnCancel);

    // assign listener to buttons
    Log.d(TAG, "assign lstener to buttons");
    btnOk.setOnClickListener(this);
    btnCancel.setOnClickListener(this);
  }

  @Override
  public void onClick(View v) {
    // define the button that invoked the listener by id
    Log.d(TAG, "define the button that invoked the listener by id");
    switch (v.getId()) {
    case R.id.btnOk:
      // OK button
      Log.d(TAG, "OK button");
      tvOut.setText("OK button was clicked");
      break;
    case R.id.btnCancel:
      // Cancel button
      Log.d(TAG, "Cancel button");
      tvOut.setText("Cancel button was clicked");
      break;
    }
  }

}
Eclipse will complain that it does not know Log class. Update imports (CTRL + SHIFT + O) and choose android.util.Log if asked. Run the application, click some buttons and check the logs
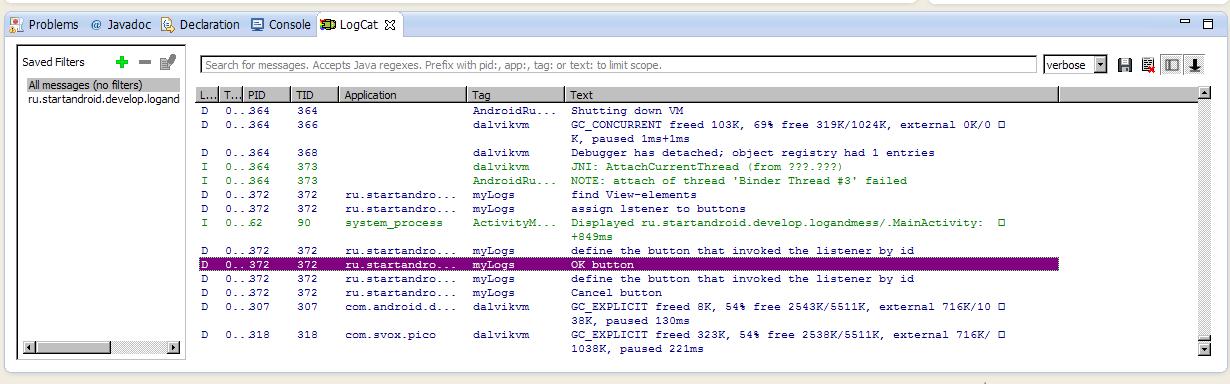
You can see that everything has been successfully written. And Eclipse has created filter (ru.startandroid.develop.logandmess) for our application. Let’s create our own filter. Click the + icon

Choose any name you wish, "My logs" for example. Log Tag - this is a value of the TAG constant, which is described in our code and was used in Log.d method. In our case it is "myLogs". Set debug log level. And other fields leave empty.

and click OK. The new tab My Logs appeared, where logs are displayed, which correspond only to our newly created filter.
We put text into the log, but it is clear that you can write values of variables that you need (their String representation).
Sometimes happens, that logs are not displayed in the LogCat tab, although AVD is launched and application works without problems. In this case the following should help: in Eclipse go to Window > Open Perspective > Other > DDMS. A little bit different than usually set of windows will open. Find the Devices tab and your AVD-device should be visible there, click on it and logs should appear. To get back to development: Window > Open Perspective > Java.
Toast messages
Application can display messages using Toast class. Let’s edit onClick method. We will make Toast message appear indicating which button was clicked.
  public void onClick(View v) {
    // define the button that invoked the listener by id
    Log.d(TAG, "define the button that invoked the listener by id");
    switch (v.getId()) {
    case R.id.btnOk:
      // ОК button
      Log.d(TAG, "ОК button");
      tvOut.setText("ОК button was clicked");
      Toast.makeText(this, "ОК button was clicked", Toast.LENGTH_LONG).show();
      break;
    case R.id.btnCancel:
      // Cancel button
      Log.d(TAG, "Cancel button");
      tvOut.setText("Cancel button was clicked");
      Toast.makeText(this, "Cancel button was clicked", Toast.LENGTH_LONG).show();
      break;
    }
  }
Let’s look through the syntax. Static method makeText creates a Toast View-element. Method parameters:
- context - we will not look through what is it in detail, just use the current Activity for now
- text - text that we need to show
- duration - duration of displaying a message (Toast.LENGTH_LONG - long, Toast.LENGTH_SHORT - short)
Toast has been created and to display it on the screen, we need to invoke show() method. Save, run the application and check.

I guess, if you have an Android smartphone, you have seen such messages before. Now you know how it is done )
In the next lesson we will:
- create menu items
Присоединяйтесь к нам в Telegram:
- в канале StartAndroid публикуются ссылки на новые статьи с сайта startandroid.ru и интересные материалы с хабра, medium.com и т.п.
- в чатах решаем возникающие вопросы и проблемы по различным темам: Android, Compose, Kotlin, RxJava, Dagger, Тестирование, Performance
- ну и если просто хочется поговорить с коллегами по разработке, то есть чат Флудильня

")