In the last lesson we have learnt that Activity reads a layout-file and displays what is configured in it. Now let’s find out how Activity knows which specific file to read.
Translated by Taras Leskiv (http://android-by-example.blogspot.com/)
In this lesson we will rotate the screen. The 2.3.3 version emulator, which we have successfully used and will be using for testing our applications further, has a bug. It doesn’t rotate the screen correctly.That’s why, please remember lesson 3 and create one more emulator of version 2.2, for instance. When creating a project specify Android version 2.2 as well. Screenshots are made on version 2.3.3 - don’t pay attention to this.
Let’s create a new project:
Project name: P0051_LayoutFiles
Build Target: Android 2.2
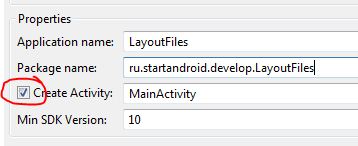
Application name: LayoutFiles
Package name: ru.startandroid.develop.LayoutFiles
Create Activity: MainActivity
In development, every Activity has a corresponding java-class (subclass of android.app.Activity). When the application runs and the system has to display Activity and to work further with it, it will invoke methods of this class. And Activity behaviour depends on the content of these methods.
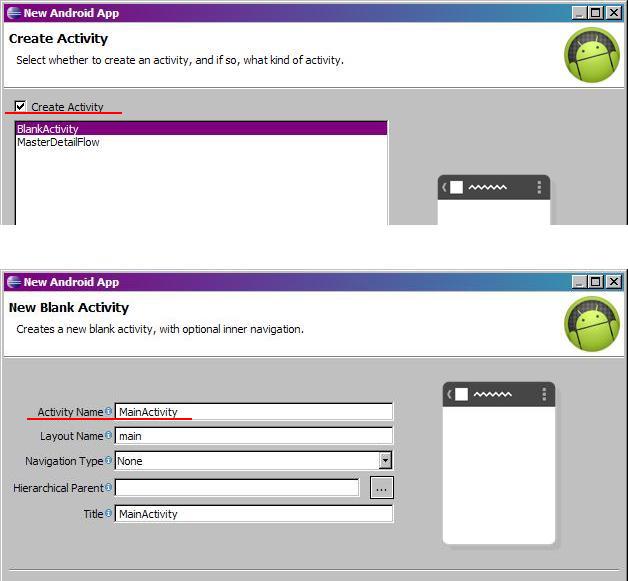
When creating a project we specified that Activity named MainActivity must be created.
When using the old wizard it looked like this:
In the new wizard - slightly different. Tick on one screen, name on the other:
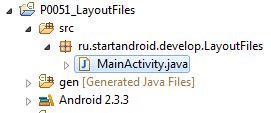
We asked to create an Activity and Eclipse has created a corresponding class for us (we will learn to create them by ourselves soon).
Let’s observe this class: double click the file src/ru.startandroid.develop.LayoutFiles/MainActivity.java
In our class we can see that onCreate method is implemented - it is invoked when the application creates and displays the Activity (ignore onCreateOptionsMenu for now). Let’s have a look at the implementation.
First line:
super.onCreate(savedInstanceState); - superclass constructor that performs all the required procedures, we do not touch it.
We are interested in this code:
setContentView(R.layout.main);
Method setContentView(int) sets the content of Activity from the layout-file. As an argument we specify not a path to our layout file (res/layout/main.xml), but a constant, which is the layout file ID. This constant is generated automatically here gen/ru.startandroid.develop.LayoutFiles/R.java.
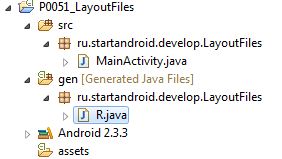
You can open and view this file, but you shouldn’t change it. In the R class all the generated IDs for all project resources (from res/* folder) will be stored, so we could refer to them. Names of these constants are the same as resource file names (without extensions).
Let’s open res/layout/main.xml and see what’s inside
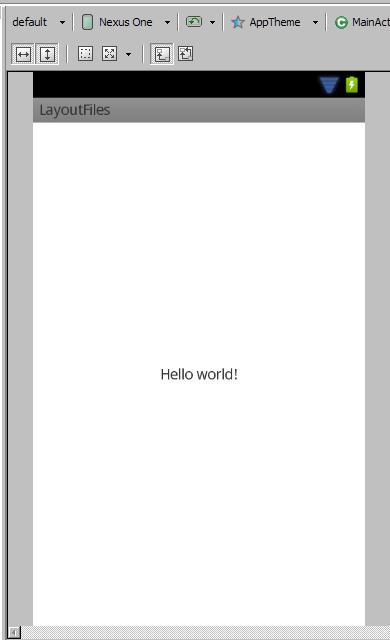
Let’s run the application and see what happens
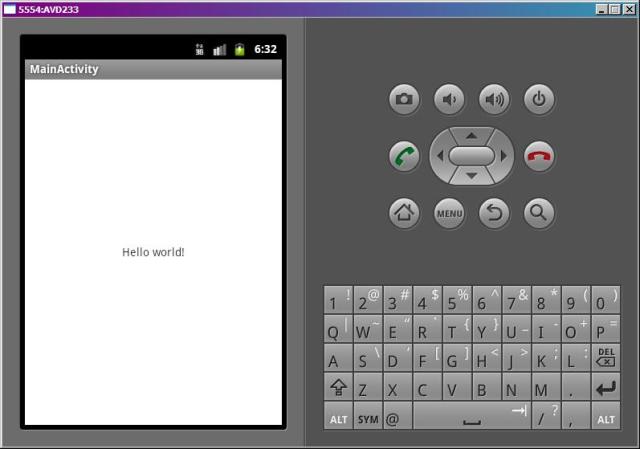
Everything is correct - Activity displays what is specified in main.xml.
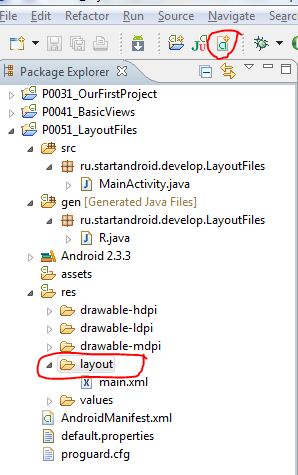
Let’s try to display the content of another file. Let’s create one more layout-file, myscreen.xml for instance. To do so, select a res/layout folder in our project and click the button for creating a new file.
The wizard will open
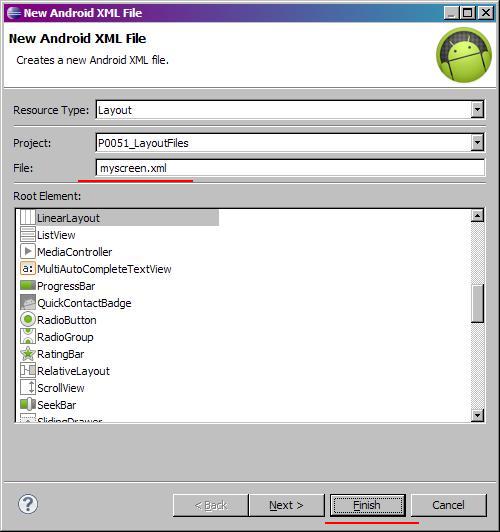
In the File field enter the name of the file: myscreen.xml and click Finish.
New layout file should open instantly. Add a TextView and change its text to "This screen is described not in main.xml, but in myscreen.xml" in Properties.
Now Eclipse will underline this text in yellow and complain saying something like this: [I18N] Hardcoded string "...", should use @string resource. It is disturbed by hardcode here. It wants us to use resource files for all the inscriptions. But for now, we don’t know how to do this, so ignore this warnings.
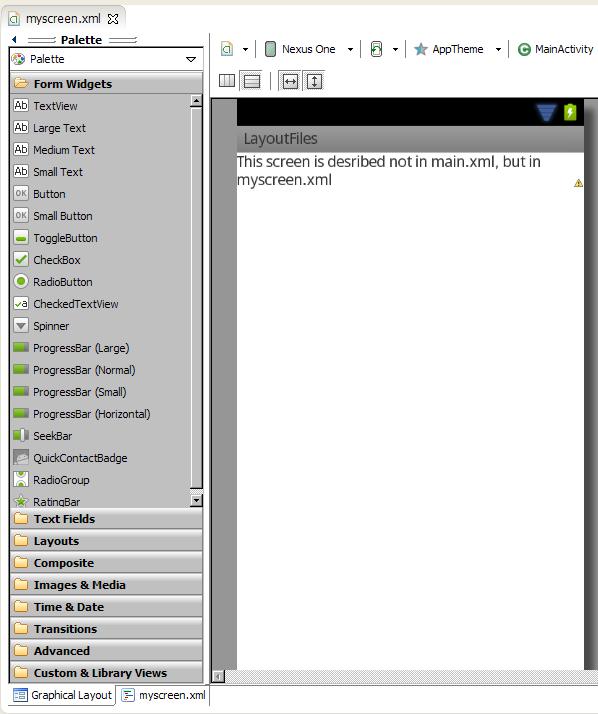
It is obligatory to save the file for the new constant to appear for this file - R.layout.myscreen.
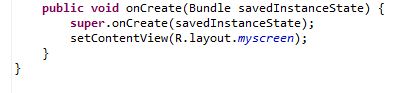
Now let’s configure Activity to use new myscreen.xml file instead of main.xml. Open MainActivity.java and change setContentView method argument. Change "R.layout.main" for "R.layout.myscreen" (ID of the new layout-file). It should be like this:
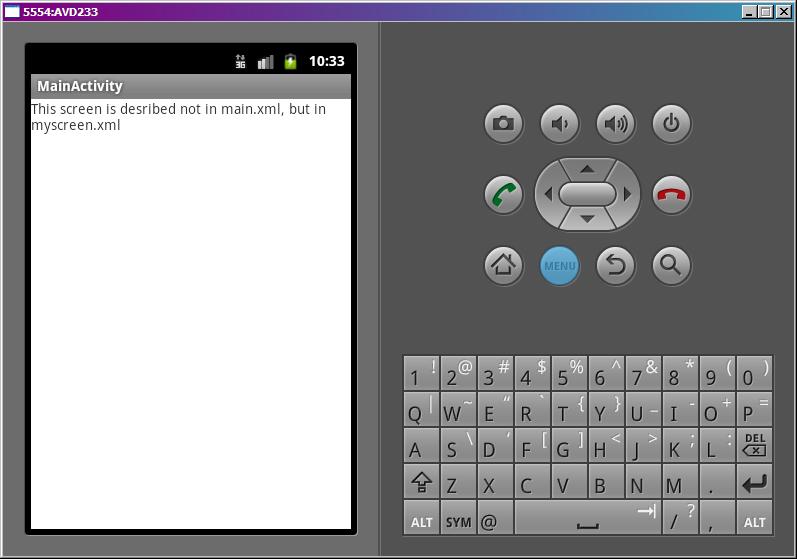
Save and run the application. We can now see that it displays the content of myscreen.xml, because we explicitly specified it in setContentView method, which is invoked when Activity is created (onCreate).
Layout-file in XML representation
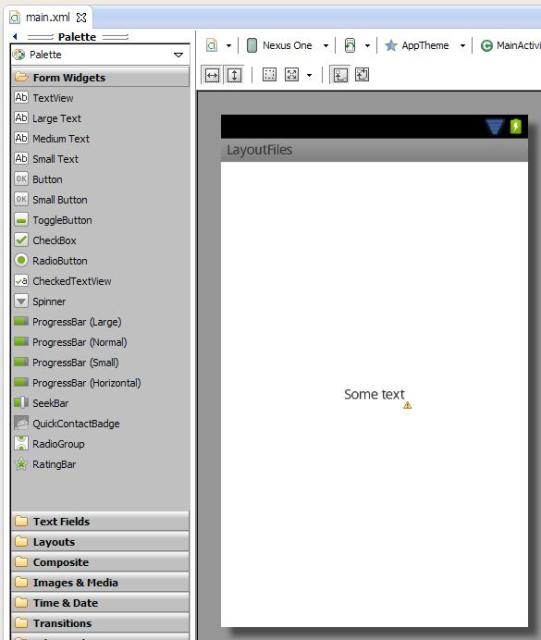
When you open main.xml you see it’s visual representation. It’s some kind of preview of how it will look on the screen. Below you can see two tabs - Graphical Layout and main.xml. Open main.xml
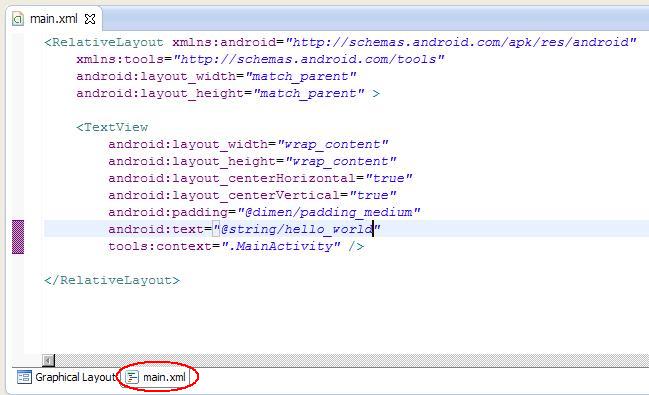
We see quite readable xml-description of all View elements in our layout-file. Names of xml-elements are classes of View-elements and xml-attributes are parameters of View-elements, which we change in Properties tab. You can also make changes right here and they will be displayed in the Graphical Layout. For example, change a text in a TextView. Instead of link to a constant, specify your own text "Some text".
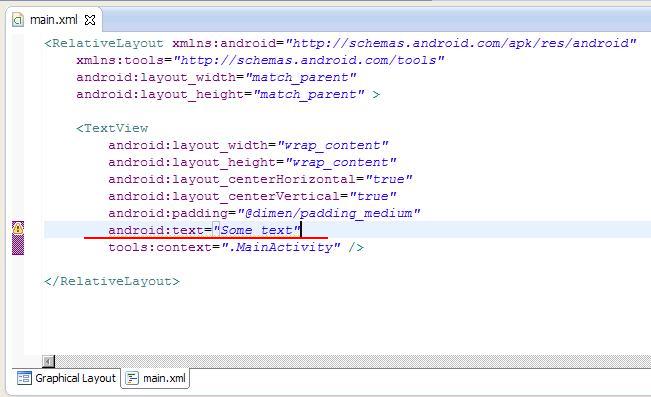
Save the file. Open Graphical Layout and view the changes.
Usually, book authors present the content of layout-files in xml representation. It is convenient - you can just copy the fragment and use it, and you don’t have to add View-elements manually and to look through Properties and configure everything manually. I will do the same way in my projects.
Layout-file when changing screen orientation
By default we configure layout-file for vertical screen orientation. But what will happen if we rotate the smartphone and horizontal orientation turns on. Let’s have a look.
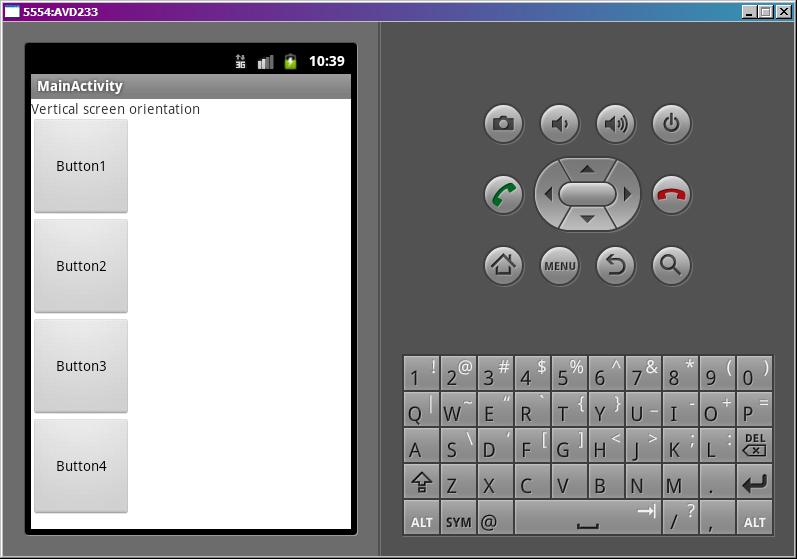
Change myscreen.xml Let’s add a vertical row of buttons and change the inscription.
xml-code (you can copy and paste it into your file)
<?xml version="1.0" encoding="utf-8"?>
<LinearLayout
	xmlns:android="http://schemas.android.com/apk/res/android"
	android:layout_width="match_parent"
	android:layout_height="match_parent"
	android:orientation="vertical">
	<TextView
		android:id="@+id/textView1"
		android:layout_width="wrap_content"
		android:layout_height="wrap_content"
		android:text="Vertical screen orientation">
	</TextView>
	<LinearLayout
		android:id="@+id/linearLayout1"
		android:layout_width="match_parent"
		android:layout_height="wrap_content"
		android:orientation="vertical">
		<Button
			android:id="@+id/button1"
			android:layout_width="100dp"
			android:layout_height="100dp"
			android:text="Button1">
		</Button>
		<Button
			android:id="@+id/button2"
			android:layout_width="100dp"
			android:layout_height="100dp"
			android:text="Button2">
		</Button>
		<Button
			android:id="@+id/button3"
			android:layout_width="100dp"
			android:layout_height="100dp"
			android:text="Button3">
		</Button>
		<Button
			android:id="@+id/button4"
			android:layout_width="100dp"
			android:layout_height="100dp"
			android:text="Button4">
		</Button>
	</LinearLayout>
</LinearLayout>
Note that I’ve added vertical LinearLayout and put four buttons inside. We will discuss it in the next lesson in more detail.
Run the application. Everything is fine in vertical orientation.
Press CTRL+F12 in the emulator, screen orientation changed to horizontal and our buttons do not fit the screen any more (version 2.3.3 emulator has glitches and screen orientation change doesn’t always work).

So we need one more layout-file, which will be made for horizontal orientation and in our case will display buttons horizontally.
But how can we notify Activity, that in vertical orientation it has to use one layout-file and in horizontal - another? Android creators have already solved this issue for us. We must create a res/layout-land folder, and create a layout-file inside with the same name as in res/layout folder. This file will be used in horizontal orientation.
Create a folder: right click on res, New > Folder, Folder name = layout-land, click Finish.
Then we will create res/layout-land/myscreen.xml file and configure it for landscape orientation. Identically as the first time, click the button for file creation. The wizard will open.
Enter the name of the file: myscreen.xml

The wizard can complain that the destination file already exists - The destination file already exists. That’s because it looks at earlier created res/layout/myscreen.xml file. We have to specify that the new file must go into res/layout-land folder, not res/layout. Click Next.
And here just manually add the suffix -land to get res/layout-land

As a variant, we were able not to add the suffix manually, but to add Orientation attribute from the left column and specify it the value Landscape. Wizard would have understood everything right and added the -land suffix by itself.
We have added the path manually and wizard added the attribute to the right.
Click Finish and the file is now ready.

Put this xml-code into the file and save it to get the same screen as above.
<?xml version="1.0" encoding="utf-8"?>
<LinearLayout
	xmlns:android="http://schemas.android.com/apk/res/android"
	android:layout_width="match_parent"
	android:layout_height="match_parent"
	android:orientation="vertical">
	<TextView
		android:id="@+id/textView1"
		android:layout_width="wrap_content"
		android:layout_height="wrap_content"
		android:text="Horizontal screen orientation">
	</TextView>
	<LinearLayout
		android:id="@+id/linearLayout1"
		android:layout_width="match_parent"
		android:layout_height="wrap_content"
		android:orientation="horizontal">
		<Button
			android:id="@+id/button1"
			android:layout_width="100dp"
			android:layout_height="100dp"
			android:text="Button1">
		</Button>
		<Button
			android:id="@+id/button2"
			android:layout_width="100dp"
			android:layout_height="100dp"
			android:text="Button2">
		</Button>
		<Button
			android:id="@+id/button3"
			android:layout_width="100dp"
			android:layout_height="100dp"
			android:text="Button3">
		</Button>
		<Button
			android:id="@+id/button4"
			android:layout_width="100dp"
			android:layout_height="100dp"
			android:text="Button4">
		</Button>
	</LinearLayout>
</LinearLayout>
Run the application. Activity reads the layout-file, which we specified as a parameter in setContentView - myscreen.xml and displays its content. Switch the orientation CTRL+F12. Activity understands that it is in horizontal orientation now, it looks for myscreen.xml in the layout-land folder and uses it.

In this lesson we:
explored how Activity knows which layout file to read and configured Activity to read another file
observed layout-file from the other side - XML
found out, which layout-file is used when screen orientation changes (horizontal/vertical)
In the next lesson:
we will learn about main types of layouts: LinearLayout, TableLayout, RelativeLayout, AbsoluteLayout
Присоединяйтесь к нам в Telegram:
- в канале StartAndroid публикуются ссылки на новые статьи с сайта startandroid.ru и интересные материалы с хабра, medium.com и т.п.
- в чатах решаем возникающие вопросы и проблемы по различным темам: Android, Compose, Kotlin, RxJava, Dagger, Тестирование, Performance
- ну и если просто хочется поговорить с коллегами по разработке, то есть чат Флудильня

")