In this lesson we will:
- learn how to refer to View-elements on the screen from code and change their properties
Translated by Taras Leskiv (http://android-by-example.blogspot.com/)
Create a project:
Project name: P0081_ViewById
Build Target: Android 2.3.3
Application name: ViewById
Package name: ru.startandroid.develop.viewbyid
Create Activity: MainActivity
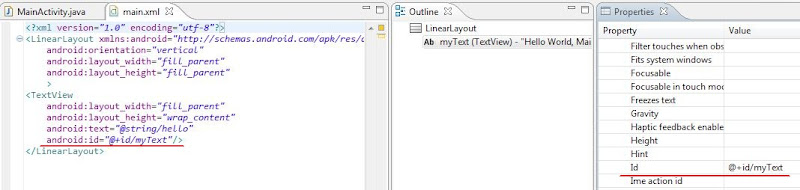
To refer to an element on screen from code we need its ID. It is specified either in Properties or in a layout-file (choose what is more comfortable for you). There is a strict format for ID - @+id/name, where + means that this is a new resource and it has to be added to the R.java class, if it isn’t already there.
Let’s open main.xml, specify ID = @+id/myText for the TextView and save the file.
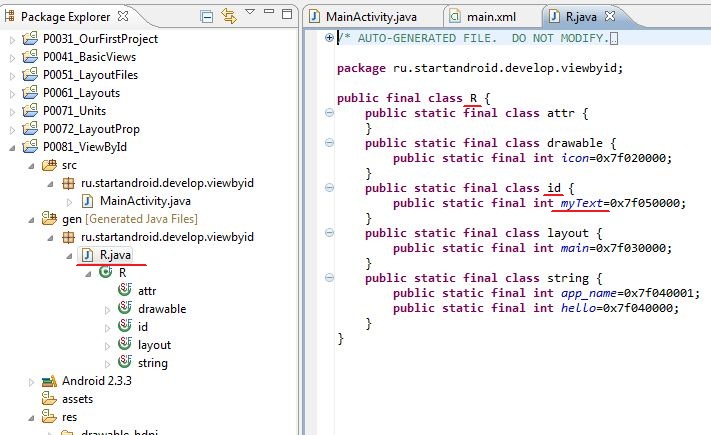
Now if you open R.java, you can see that the constant myText appeared in the id class. So to refer to this constant we have to write R.id.myText.
This constant is tethered to TextView element and we can use it to refer to the element programmatically. We will need findViewById method for this. It returns the View by its ID. Let’s write this method call. Remind that for now, we are writing our code inside onCreate method. This is a method that is invoked when an Activity is created. If it’s not clear where to write, please look at the code in the end of the lesson.
Open MainActivity.java and after a setContentView method call write:
View myTextView = findViewById(R.id.myText);
If View is underlined in red, most likely this class is not added in the import section. Press CTRL + SHIFT + O to automatically update imports.
Now myTextView (of the type View) is our TextView from the screen. But type View is a superclass for a TextView (and other VIew-elements). And it doesn’t fit us, if we want to perform operations related to a TextView. That’s why we have to cast View to TextView. Edit our code to become like this:
TextView myTextView = (TextView) findViewById(R.id.myText);
Now myTextView is of type TextView and the returned value of findViewById method is cast from View to TextView. Now we can invoke TextView methods on myTextView object. Let’s take setText method for instance. For now, displayed text = Hello World, MainActivity!. We will change it programmatically to New text in a TextView
myTextView.setText("New text in TextView");
Save and run the application (CTRL + F11) and we can see that the text has changed

Add a button to the screen (Button), Id = @+id/myBtn, leave the default text. Save - CTRL + SHIFT + S (If you don’t save, ID will not appear in R.java).
Write some code:
Button myBtn = (Button) findViewById(R.id.myBtn);
Note, that in my case object name matches the object ID

They do not interfere with each other and it’s even more logical this way. So it is up to you. So we have found the button, let’s now change its text:
myBtn.setText("My button");
Run the application. Button text has changed, you can click the button several times but nothing will happen. This is because we didn’t specify what to do when the button is pressed. We will implement this in the next lesson. For now, let’s make a button disabled.
myBtn.setEnabled(false);
We have changed the Enabled property. Now you can’t click the button. Save, run and make sure the button is disabled.

Add a CheckBox, id = @+id/myChb. There is not tick by default. Let’s check it programmatically, using setChecked method, which changes Checked parameter.
CheckBox myChb = (CheckBox) findViewById(R.id.myChb);
myChb.setChecked(true);
Run the application and make sure the code works.
As you can see it’s not complicated. We are using findViewById method to get (by ID) the object which refers to some View-element on the screen (Button, TextView, CheckBox) and then we invoke methods on these objects (setText, setEnabled, setChecked) which we need.
In the end you have to come up with this code:
package ru.startandroid.develop.viewbyid;


import android.app.Activity;
import android.os.Bundle;
import android.widget.Button;
import android.widget.CheckBox;
import android.widget.TextView;

public class MainActivity extends Activity {
    /** Called when the activity is first created. */
    @Override
    public void onCreate(Bundle savedInstanceState) {
        super.onCreate(savedInstanceState);
        setContentView(R.layout.main);

        TextView myTextView = (TextView) findViewById(R.id.myText);
        myTextView.setText("New text in TextView");

        Button myBtn = (Button) findViewById(R.id.myBtn);
        myBtn.setText("My button");
        myBtn.setEnabled(false);

        CheckBox myChb = (CheckBox) findViewById(R.id.myChb);
        myChb.setChecked(true);
    }
}
In the next lesson we will
- learn how to process button clicks
Присоединяйтесь к нам в Telegram:
- в канале StartAndroid публикуются ссылки на новые статьи с сайта startandroid.ru и интересные материалы с хабра, medium.com и т.п.
- в чатах решаем возникающие вопросы и проблемы по различным темам: Android, Compose, Kotlin, RxJava, Dagger, Тестирование, Performance
- ну и если просто хочется поговорить с коллегами по разработке, то есть чат Флудильня

")